How to Add a New Hard Drive to Your Computer in 8 Steps

Hard Drive with Exposed Wiring and Makeup
An additional hard drive provides more disk space on your computer. Narumon Bowonkitwanchai / Getty Images

Do you own a computer that is more than a year old? If so, then you may be running out of disk space. In the same way that closets and attics have a way of filling up and overflowing, so do hard drives. Maybe your 8-megapixel camera needs a gigabyte of disk space every time you unload the camera's memory card. Or your MP3 collection grows by 10 songs every day. Perhaps you are trying to edit videos of the kids, and every 5 minutes of tape consumes a gigabyte of disk space. Or maybe you would like to add a TV tuner card to your machine and turn your computer into a DVR.

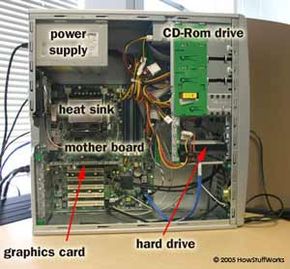
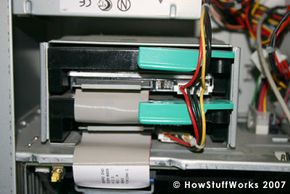
Digital cameras, video cameras, MP3 players and TV tuner cards all consume lots of disk space. If you use any of these gadgets, chances are that you need more space. In this article, we will show you how easy it is to add a new hard drive to your existing machine.

Advertisement

1: Research your machine

PCs, like the one above, are a general purpose tool with many parts.
HowStuffWorks 2005

­ Before we start the process of adding a drive, we need to do a small amount of research inside your machine. The goal of the research is to find out if it will be easy or not so easy to add the new hard drive. We also need to find out what kind of drive you need to buy. You may be able to do this research by reading through your computer's manuals, but it is far easier to simply open the case and look inside.

The first question to answer is: How many hard disk drives have already been installed inside the case? In the majority of machines, the answer to this question is "one." Having only one hard disk drive installed makes it easy to install another one. After you open up your computer's case and look inside, you will probably find one optical drive (a CD or DVD drive), a single hard disk drive and perhaps a floppy disk drive. The optical and floppy drives will be easy to find because you can see them on the outside of the case. The hard drive may take a little searching. If you have no idea what a hard drive looks like, look at the photo above.

Advertisement

If there are already two drives installed inside your case, then adding a new one is more difficult.

2: Check how much space is available

This cage contains two hard drives. If the computer's user wanted an additional hard drive, he would have to add an external one.

Is there space available to add another hard-disk drive? Your current hard disk is probably mounted in a small metal cage or rack inside the machine. Make sure there is space available in the cage for another drive. If not, adding an external drive is an option.­

An external drive connects to your computer through either a USB 2.0 connection or a FireWire connection, so your computer needs to have USB 2.0 or FireWire connectors. Once you buy the drive, all you have to do is connect it and fire up your computer. The drive will come with configuration instructions, but on Windows XP it will likely be plug-and-play. You can start saving files on your new drive immediately.

Advertisement

There is one big advantage to an external drive: you can plug it into multiple machines and move files around. You can take it with you anywhere you go. The only real disadvantage is that it will be slower than an internal drive. If it takes a minute to copy a gigabyte of data on an internal drive, it might take two minutes on an external drive. That may or may not be important depending on what you want to do. For most applications, the slower speed is irrelevant.

3: See what type of cable system is used

An IDE, or PATA hard drive, uses a wide, flat or thick cable to connect to the computer's motherboard.
Unknown

Find out what type of cable system is used to connect drives to the motherboard. There are two systems in common use: IDE drives (also known as PATA, or Parallel ATA), and SATA (Serial ATA) drives. PATA drives have wide, flat cables or thick cables as wide as your finger, while SATA drives have thin cables about the diameter of a pencil. You will need to know whether to buy an IDE or SATA drive, and you should be able to tell by looking at the cables.

Now that you have confirmed that there is space to install a new drive in your machine and you know what type of drive you need (PATA or SATA), you can buy a new drive.

Advertisement

4: Buy a new hard drive

A SATA hard drive uses thin cables about the diameter of a pencil to connect to the computer's motherboard.
© iStockphoto.com/fatbob2

­You can buy a new hard drive from many different places: a retail store, a large computer store, a local computer parts store or by mail order. Wherever you go to buy it buy it, keep three things in mind:

  • Buy a "normal" 3.5-inch wide hard drive. They're sold everywhere, but you want to avoid the smaller hard disk drives made for laptops.
  • Make sure the new drive has the correct cable system (SATA or PATA) to match your machine.
  • Make sure the drive is big. Buy the biggest drive you can afford, because it will probably fill up before you know it.

Now that you have your new drive, you are ready to install it.

Advertisement

5: Eliminate static electricity

To avoid passing static electricity to your new hard drive, you can wear an inexpensive grounding bracelet.

Before we start working with the drive, we need to talk about static electricity. Your computer is highly sensitive to static shocks. This means that if you build up static electricity on your body and a shock passes from your body to something like a hard drive, that hard drive is dead and you will have to buy another one. ­

The way to eliminate static electricity is by grounding yourself. There are lots of ways to do this, but probably the easiest way is to wear a grounding bracelet on your wrist. Then you connect the bracelet to something grounded (like a copper pipe or the center screw on a wall outlet's face plate). By connecting yourself to ground, you eliminate the possibility of static shock. You can get a bracelet for a few dollars.

Advertisement

6: Set the jumpers

­ First, set the jumpers (if it is an IDE drive). Let's talk about this in more detail, because most people have IDE drives.

In the IDE system, most motherboards allow you to have two IDE cables. Each cable can connect to two drives. Usually you use one cable to connect one or two optical drives to your machine. The other cable is used to connect one or two hard drives to your machine.

Advertisement

You want both hard drives to be on the same cable. The two drives on the cable are called "master" and "slave." You want your existing hard drive (which contains the operating system and all of your current data) to be the "master" and the new hard drive to be the "slave." The drive should have instructions on them that tell you how to set the jumpers for master and slave. So read the instructions and set the jumpers. If you are using SATA drives, you do not need to set jumpers for master and slave because each drive gets its own cable. Check out How IDE Controllers Work to learn more about the master and slave configuration.

7: Mount the drive and connect

­

Now that the jumpers are set correctly, mount the new drive in your drive cage and screw it into place.

Advertisement

Next, plug in the drive's power connector to the power supply. If it fits, then it's a match.

Connect the IDE or SATA cable to the drive.

8: Format the new drive

The last step in the process of adding a new hard drive is formatting that hard drive using the Windows XP drive adminstration tool.

­

Close the machine, power it up and configure your new drive using the Windows XP drive administration tool. To do this, click the Start button, open the Control Panel, Switch to Classic View, click on Administrative Tools, click on Computer Management, click on Disk Management. (For Windows Vista instructions, click here.)

Advertisement

Look at the graphical area in the bottom right of this display. Disk 0 is your original hard drive. Disk 1 is the new hard drive. Chances are that the new drive will not be initialized , or formatted. Click the small button to initialize the drive, and then format it as an NTFS volume (right click on the new drive, then click “Format...”). Formatting may take an hour or more, so be patient.

When the formatting is done, you are ready to use your new drive.

For lots more information on hard drives, computers and more, check out the links on the next page.