Configuring BIOS
In the previous list, you saw that the BIOS checks the CMOS Setup for custom settings. Here's what you do to change those settings.
To enter the CMOS Setup, you must press a certain key or combination of keys during the initial startup sequence. Most systems use "Esc," "Del," "F1," "F2," "Ctrl-Esc" or "Ctrl-Alt-Esc" to enter setup. There is usually a line of text at the bottom of the display that tells you "Press ___ to Enter Setup."
Advertisement
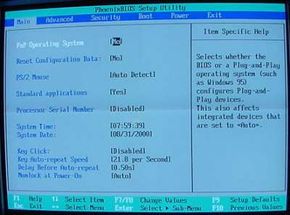
Once you have entered setup, you will see a set of text screens with a number of options. Some of these are standard, while others vary according to the BIOS manufacturer. Common options include:
- System Time/Date - Set the system time and date
- Boot Sequence - The order that BIOS will try to load the operating system
- Plug and Play - A standard for auto-detecting connected devices; should be set to "Yes" if your computer and operating system both support it
- Mouse/Keyboard - "Enable Num Lock," "Enable the Keyboard," "Auto-Detect Mouse"...
- Drive Configuration - Configure hard drives, CD-ROM and floppy drives
- Memory - Direct the BIOS to shadow to a specific memory address
- Security - Set a password for accessing the computer
- Power Management - Select whether to use power management, as well as set the amount of time for standby and suspend
- Exit - Save your changes, discard your changes or restore default settings
Be very careful when making changes to setup. Incorrect settings may keep your computer from booting. When you are finished with your changes, you should choose "Save Changes" and exit. The BIOS will then restart your computer so that the new settings take effect.
The BIOS uses CMOS technology to save any changes made to the computer's settings. With this technology, a small lithium or Ni-Cad battery can supply enough power to keep the data for years. In fact, some of the newer chips have a 10-year, tiny lithium battery built right into the CMOS chip!