How Web Pages Work

web page
Have you tried to create your own web page? Mikroman6 / Getty Images

Have you ever wondered how a Web page works? Have you ever wanted to create your own Web page, complete with titles and text and graphic icons? Have you ever heard the word "HTML" and wondered what it means? If so, then read on...

In this article, we will look at the art and science of Web pages and experiment with a number of techniques that you can try out on your own machine today. We've even created a tool that lets you try out HTML and view it instantly. As it turns out, Web page creation is both incredibly easy and a lot of fun, and totally within your reach. By the time you finish reading this article, you will be ready to start assembling your own!

Advertisement

Setting the Stage

At this moment, it is nearly guaranteed that:

  • You are sitting at your computer.
  • You are using a Web browser to read this page, and that browser could be Microsoft Internet Explorer, Firefox or maybe Netscape.
  • You want to learn how Web pages work, and perhaps learn the art of creating your own pages.

Because you are sitting at a computer, you have a Web browser and you possess the desire to learn, you have everything you need to get started. You can learn HTML and experiment with your Web browser to find out how to create any kind of Web page you can imagine.

Advertisement

In order to talk about Web pages and how they work, you will want to understand four simple terms (and if some of this sounds like technical mumbo-jumbo the first time you read it, don't worry):

  • Web page - A Web page is a simple text file that contains not only text, but also a set of HTML tags that describe how the text should be formatted when a browser displays it on the screen. The tags are simple instructions that tell the Web browser how the page should look when it is displayed. The tags tell the browser to do things like change the font size or color, or arrange things in columns. The Web browser interprets these tags to decide how to format the text onto the screen.
  • HTML - HTML stands for Hyper Text Markup Language. A "markup language" is a computer language that describes how a page should be formatted. If all you want to do is display a long string of black and white text with no formatting, then you don't need HTML. But if you want to change fonts, add colors, create headlines and embed graphics in your page, HTML is the language you use to do it.
  • Web browser - A Web browser, like Netscape Navigator or Microsoft Internet Explorer, is a computer program (also known as a software application, or simply an application) that does two things: A Web browser knows how to go to a Web server on the Internet and request a page, so that the browser can pull the page through the network and into your machine. A Web browser knows how to interpret the set of HTML tags within the page in order to display the page on your screen as the page's creator intended it to be viewed.
  • Web server - A Web server is a piece of computer software that can respond to a browser's request for a page, and deliver the page to the Web browser through the Internet. You can think of a Web server as an apartment complex, with each apartment housing someone's Web page. In order to store your page in the complex, you need to pay rent on the space. Pages that live in this complex can be displayed to and viewed by anyone all over the world. Your landlord is called your host, and your rent is usually called your hosting charge. Every day, there are millions of Web servers delivering pages to the browsers of tens of millions of people through the network we call the Internet. Read How Web Servers Work for details on this process.

It is extremely easy to experiment with Web pages without using a server. Your browser can view the Web pages you create from your personal machine. Once you understand how to create your own pages, it is likely that you will want to put them "out on a server," so that people around the world can load your pages and read them. We will talk about how to do that at the end of this article.

­

Viewing Page Source

Let's take a look at the "guts" of a Web page. This is the original text and HTML tags typed by the author and interpreted by the browser to produce the Web page you actually SEE on the Internet. With your mouse, right-click on any blank portion of this page and choose "View Source." A new window will appear, displaying words and characters, some of which may look pretty technical and foreign. These words and characters are, collectively, the HTML programming code you are about to learn. Each element within that code is known as an HTML tag. Don't be intimidated by how complex it looks -- you'll be surprised at how easy it really is. When you are done looking at the page's source code, simply close out the source page to return to this article.

You can look "behind the scenes" of almost any page on the Internet this way. When you become more involved in Web designing, you'll probably find yourself viewing the sources of complicated Web pages in order to learn the codes that the authors, or page designers, used to create such interesting arrangements.

Advertisement

Now, let's learn what many of the tags mean, and start creating a simple page.

The HTML Tag

An HTML tag is a code element that tells the Web browser what to do with your text. Each tag will appear as letters or words between a < (less than sign) and a > (greater than sign).

Example: <center><body>

To tell the Web browser to "end" doing what you just told it to do, a forward slash is used in the closing tag:

Example: </center></body>

Most tags come in matched "beginning" and "ending" pairs, but this is not an absolute rule.

Any Web page you create will contain the following tags at the start of the page:

  • <HTML>: tells the Web browser that this is the beginning of an HTML document
  • <HEAD>: tells that Web browser that this is the header for the page (you'll learn later what goes between "HEAD" tags)
  • <TITLE>: tells the Web browser that this is the title of the page
  • <BODY>: tells the Web browser that this is the beginning of the Web page content -- everything you want to say and see on your page will follow this tag.

The tags needed to end any Web page are:

  • </BODY>
  • </HTML>

In the next section we'll find out how to create a simple web page.

Creating a Simple Web Page

There are many ways to create Web pages. Hundreds of companies have created tools to help with the process in one way or another. Our goal here, however, is to understand how Web pages really work, rather than have a tool hide the process from us. Therefore, we will use the simplest tools possible -- the ones already on your machine.

On your machine you have a program, or application, that can create simple text files. On Windows machines, this application is called Notepad. On a Macintosh, this program is called SimpleText. If you cannot find these programs, it is also possible to use a basic word processing program, like WordPerfect or Microsoft Word.

Advertisement

  • Note:
  • In a Windows 95/98 environment, click the Start button, click Programs, click Accessories and click Notepad.
  • In a Windows 3.1 environment, click Accessories (in the Program Manager) and click Notepad.
  • In a Macintosh environment, click Macintosh HD, click Applications and click SimpleText.

Once you have the proper program open on your screen, type (or cut-and-paste) the following HTML text into the window:

<html>
  <head>
    <title>My First Page</title>
  </head>
  <body>
    Hello there. This is my first page!
  </body>
</html>

Whether you put the tags and text side-by-side, row-by-row or indented will not make a difference in how the text is displayed in a browser window. Whether you use uppercase or lowercase letters within your tags also does not make a difference.

Now you need to save this file somewhere so that you can find it in a moment. Save it to the desktop, or, better yet, to a directory that you set up to hold all of the pages you are going to create. Save it to the filename first.html.

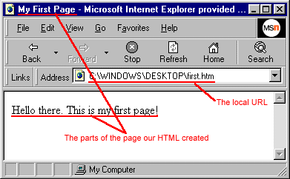
Next, open the page in your Web browser (e.g., Microsoft Internet Explorer or Netscape Navigator). All Web browsers have a way to open a file stored on the local machine. In Internet Explorer and Netscape, select Open File from the File menu at the top of the window. Open the file first.html. When you open it in your browser, it will look something like the image above.

Three things are identified in this figure:

  • You can see that the page has the title "My First Page."
  • You can see that the page's body contains the words "Hello there. This is my first page!"
  • You can see that the URL being displayed in the address window is C:WINDOWSDESKTOPfirst.html from the local hard disk, rather than the usual http://... that a URL would contain if we were receiving the page from a server on the Internet.

By looking at the HTML text that makes up your first page, you can see exactly how the page got its title and body.

Now that you have created and viewed your first Web page, you are well on your way to becoming a Web page pro. The key to knowing everything about how a Web page works is to learn more and more of the HTML tags that let you customize your pages. You'll also want to learn about tools that can help you create tables, frames and graphics for your pages. This Web page series will guide you through all of the information you need.

Basic HTML Form

You will use the basic HTML tags on this page all the time -- they do 90% of all the formatting that you see on most Web pages. Once you learn them, you are well on your way to becoming an HTML pro!

  • If you liked the "first.htm" file we discussed on the previous page, you can type HTML into it and create complete Web pages. Remember to place all the information you want displayed on your Web page between the and tags. Experiment with your page by adding new tags and checking out the results.

Let's get started!

Advertisement

Bold, Italics and Underline

Make any piece of text bold by adding the tag: <b> to the beginning of the text, and adding the closing tag: </b> wherever you want the bold attribute to end.

This is <b>bold</b>. This is bold.

To italicize, use these tags in the same manner:

<i>... </i>This is <i>italicized</i>. This is italicized.

To underline, use these tags:

<u>...</u>This is <u>underlined</u>

­Breaks and Paragraphs

Although your typed text may contain carriage returns, tabs and extra spaces, browsers will not see them. You will have to use tags in order to create blank space in your HTML documents.

<br> creates a break between one line and another. You can use several of these tags together to create blank space.

<p> creates an extra space between two lines of text. If you place in a line of text, it will only break the line; if you use <p>, it will both break the line and create an extra space.

<hr> creates a horizontal rule or horizontal line.

Tabs

There is no formal HTML tag to create a "tab" within a document. Many Web designers create tables or use blank images to create space (tables and images are explained later in this article). One way to indent text is to use the tag <ul>­ ­to make the browser think you are about to create a "list." A list automatically indents text. Close with a </ul> to "end" the indentation. The tags <blockquote> ... </blockquote> will also indent text.

Another alternative is the <pre> tag. This tag is used to display preformatted text -- text displayed as is. Any text between <pre> and </pre> tags will appear in the browser as it appears in the source.

Font Color and Size

Color

Change the color of any text by using the tags:

<font color="color">...</font>

Advertisement

This is <font color="blue">blue</font>. 

This is <font color="green">green</font>.

Most standard colors will work. Also try "lights" and "darks" such as "lightblue" or "darkgreen." You can also specify a particular hexadecimal color number, such as: <font color="#864086">. For a list of hexadecimal color codes, visit December.com: HTML.

If you would like to assign a specific color to the entire text of your page, add text="color" within the tag.

Example: <body text="blue">

Even if you assign a color to your entire text, you can still change the color of any portion of that text by using the tags you learned above.

Font Type

Change the font type of any text by using the tags: <font face="font type"> ... </font>

 This is <font face="arial">arial</font>.

This is <font face="geneva">geneva</font>.

(Note: If the font type you specify is not available in the user's computer, the font type will default to the browser default, usually Courier or Times New Roman; so it is best to stick to standard font types if you want to be able to control what is displayed in the user's browser.)

Size

Change the size of any text by using the tags:

<font size=value>...</font>

Example: <font size=4>

 The default font size on most browsers is "3", so any values larger than 3 will make the text larger, and any values smaller than 3 will make it smaller.

You can also change the font size by adding to or subtracting from the default font size.

Example: <font size=+4>, or <font size=-2>

 This font is <font size=+2>increased by 2</font>

This font is <font size=+1>increased by 1</font>

This font is <font size=-2>decreased by 2</font>

This font is <font size=-1>decreased by 1</font>

You can also change the font size by using the tags <small> and <big>:

This is <small>small</small> text. 

This is <big>big</big> text.

Headings

Heading tags also change font size, creating a bold "heading" for a paragraph or story:

<h1>This is an H1 heading.</h1> 

<h2>This is an H2 heading.</h2>

<h3>This is an H3 heading.</h3> 

End any font element change with the tag:

</font>

Or, by using the coordinating ending pair for the specific tag you used:

 Example: </small>, </big>, </H2>

In the next section, we'll find out how to add background color.
Adding Background Color

Change the background color of your page by adding bgcolor="color" within the tag.

Example: <body bgcolor="yellow">

Advertisement

Again, as was described in the section on changing font color, you can use most standard colors, or use a Hexadecimal Color Code.

Creating Lists

There are three types of lists you can create: Unordered, Ordered and Descriptive.

Unordered List

An unordered list looks like this:

  • California
  • Oregon
  • North Carolina

An unordered list is a bulleted list initiated by the tag <ul>. The tag <li> (short for List Item) is used before each item in the list. The closing tag </ul> ends the list.

Example:

<ul>
<li>California
<li>Oregon
<li>North Carolina
</ul>

The type of bullet can be changed to a "circle," "square" or "disc" by adding a specification within the <ul> tag:

<ul type="circle">
<li>California
<li>Oregon
<li>North Carolina
</ul>
<ul type="square">
<li>California
<li>Oregon
<li>North Carolina
</ul> 

Ordered List

An ordered list looks like this:

  1. oranges
  2. grapes
  3. cherries

An ordered list is a list of items in a logical, numbered order. Use the tags <ol> and </ol> to start and end this kind of list. Again, the <li> tag is used in front of each item.

Example:

<ol>
<li>oranges
<li>grapes
<li>cherries
</ol>

You can change the type of organization by adding a "type" designation within the <ol> tag.

<ol type="A"> orders the list by capital letters: (A, B, C...)

<ol type="a"> orders the list by small letters: (a, b, c...)

<ol type="I"> orders the list by Roman numerals: (I, II, III...)

<ol type="i"> orders the list by small Roman numerals: (i, ii, iii...)

If you would like to start your ordered list with a specified value, such as "6," use the following "start" and "value" tags:

<ol start=5>
<li value=6>

Descriptive Lists

A descriptive list creates a list of text items with an indented second line:

Marshall Brain
    Founder of HowStuffWorks 

Use the following tags in this manner:

<dl>
<dt>Marshall Brain
<dd>Founder of HowStuffWorks
</dl> 

The <dt> tag should correspond with the text you want lined up on the margin; <dd> corresponds with the line you want indented.

In the next section we'll find out how to link to other sites.

Linking to Other Sites

One of the best parts about Web pages is the ability to create links to other pages on the Web. Using the following anchor tags, you can reference other people's work, point to other pages you like, etc:

<a href="URL">

Advertisement

Type in the title of the page after the anchor tag, and close the anchor with:

</a>

Example:

<a href="https://www.howstuffworks.com"> HowStuffWorks </a>

This is how it will look on your page:

HowStuffWorks

You can also easily combine bulleted lists with links to create a list of links.

New Windows

If you do not want visitors to leave your page when they click on one of your links to another site, add this tag to your anchor tag. When the link is clicked, instead of taking the user away from your site and into someone's else's, it will simply open a new, blank window to display the link's destination:

target="_blank"

Example:

<a href="https://www.howstuffworks.com" target="_blank">

Link Color

Blue is the standard default color for links. But you can change the colors of linked information on your page by inserting these tags within your <body> tag:

  • link="color"
  • vlink="color"

Vlink stands for "visited link." Links change colors when they have been visited. If you do not want visited links to change color, simply attribute the same color to both links and vlinks.

Example: <body link="green" vlink="green">

Linking to Receive E-mail

If you would like to receive e-mail from people who read your page, use the following anchor tag:

<a href="mailto:youremailaddress">

Then type your e-mail address (or whatever link text you would like to have shown on your page) again after the tag. Close the string with:

</a>

Example:

<a href="mailto:example@howstuffworks.com"> E-mail Me </a>

This is how it will look on your page:

E-mail Me

Creating Links to Your Own Page

Anchor tags are not only used for linking to pages on the Internet. You can also use them to link to information located within your own page. In this instance, you can omit the prefix "http://www" and just include the html document file name:

Example: <a href="company.htm"> Company Information </a>

To link to a specific portion of your page, you will need to name the section you are referring to, and include that name within the link's anchor tag. Here's how:

Name any section of your page by inserting the following tag immediately before the specific section you want the link to refer back to. You can choose any word, letter or character to use as a name:

<a name="name">

Example: <a name="5">

In the anchor tag, you refer to this portion of your page by putting a "#" in front of the name. If the named link refers to a location within the page that contains the link, the anchor tag linking to this named portion would look like this:

<a href="https://www.howstuffworks.com/#5"> Company Information </a>

If the named link refers to an html document separate from the page the link is located in, include the html document file name as well.

Example: <a href="https://www.howstuffworks.com/company.htm#5"> Company Information </a>

In the next section we'll find out how to add images.

Adding Images and Graphics

Place any digital image on your page using the following tag:

<img src="name of picture file.extension">

Advertisement

Images on Web pages are either GIF files (pronounced "jiff") or JPG files (pronounced "jay- peg"). Any image will contain one of those extensions, so if you have an image called "logo," it will be labeled either "logo.gif" or "logo.jpg."

Be sure to store the images and graphics that you will be displaying on your Web page in the same folder or directory that you have your "html" file stored into. Otherwise, your computer will have trouble finding the picture you want displayed. Also, be sure to type the picture name exactly how it is saved into that folder -- file names are case sensitive.

Justification

By default, your text and images are left-justified when displayed in your browser, meaning that text and graphics automatically line-up on the left margin. If you want to "center" any portion of your page instead, you can use the following tag:

<center>

You can end the centering with the corresponding closing tag:

</center>

You can also code "divisions," anything from a word to a line of text to an entire page, to be justified a certain way.

Start your division with the division alignment tag, including the justification you wish the text or images to take on (i.e. right, left, center):

Example: <div align="center">

End the division justification alignment with the tag:

</div>

With the information you have just learned in this article, you can begin to create very interesting and eye-catching Web pages. Try creating a Web page or two using the tools and tags we just discussed. If you're eager to have the world view your masterpiece, then skip to the article "Getting Your Page Online" to learn how to publish your new Web page.

Creating Tables

Currently, one of the most widely used HTML tools for creating artfully arranged Web pages is the table. By mastering tables, you are no longer just "creating" a page, you are "designing" one.

The variety of tables at your disposal is extensive, ranging from a simple box to very complex design layouts. In this article we will discuss table basics, as well as a few tricks and hints for you to experiment with in your quest to design an exciting page that people will love to visit.

Advertisement

Again, as with all information you would like displayed in the browser window, make sure your table is between the <body> and </body> tags in your HTML document. Begin your table with the following tag:

<table>

Each horizontal row in a table begins with the tag:

<tr>

And, each piece of data within the row begins with the tag:

<td>

Consider the following table diagram:

A1  A2

B1  B2

C1 C2

Here we have three rows and two columns.

To code the skeleton of this diagram, the following tags are used in the following order:

<table>    starts the table

<tr>       starts the first row

<td>      starts the first "cell" of data (A1)

</td>    closes the A1 cell

<td>      starts the second cell (A2)

</td>    closes the A2 cell

</tr>     closes the first row

<tr>       starts the second row

<td>      starts the first cell of data in the second row (B1)

</td>    closes the B1 cell

<td>      starts the B2 cell

</td>    closes the B2 cell

</tr>     closes the second row

<tr>       starts the third row

<td>      starts the first cell of data in the third row (C1)

</td>    closes the C1 cell

<td>      starts the C2 cell

</td>    closes the C2 cell

</tr>     closes the third row

</table>  closes the table

Many designers like to indent portions of their tables to make the coding easier to read. An example of this is shown below.

Now we will add data and a border to the skeleton table. A border is the outline of a table. The border tag (border="value") is placed within the initial table tag. You can specify how thick you would like the outline to appear by assigning a particular value (we will assign a value of "1"). It's a good idea to experiment with different values to find out what they look like displayed in the browser. If you do not want a border to show, assign a "0" value.

(Note: Even if you are not planning to have a border appear around your table, it is always best to start with a visible border, at least until you work out any "bugs" that may be affecting the way your table is displayed.)

Type (or cut and paste) the following code and data into your HTML document:

<table border=1>   
<tr><td>A1    </td>    
<td>A2</td>   </tr>   
<tr><td>B1    </td>    
<td>B2</td>   </tr>   
<tr><td>C1    </td>    
<td>C2</td>   </tr>  
</table>  

The table displayed in your browser should look a lot like the diagram shown earlier.

There are many attributes you can assign to a table. What follows is a discussion of the tags that will allow you to format your table in lots of creative ways.

In the next section we'll find out how to change the background color of the table.

Changing the Table Background Color

Change the color of entire table background by using the "bgcolor" tag within the initial "table" tag:

Example: <table bgcolor="yellow">

Advertisement

A colored background can also be assigned to a row or a cell within a table. Just add bgcolor="color" to either the <tr> or <td> tag to color that specific portion of the table.

Example: <tr bgcolor="yellow">

Table Size

The width and height of rows and columns in a table will expand automatically to fit the length of data and/or the space of the browser window. To specify a width and height, include either pixels or percentage values within the starting "table" tag:

Example: <table width=300 height=400>

Width and height can also be specified for an individual data cell, as opposed to the table as a whole. To do this, add width="value" to the <tr> or <td> tag in question.

Again, it's a good idea to simply experiment with pixel and percentage values to find out what they look like in a browser.

Cellpadding

The "cellpadding" tag specifies (in pixels) the amount of space between the edges of each cell and the data inside each cell. Use it within the starting "table" tag:

Example 1: <table border=1 cellpadding=5>

Example 2: <table border=1 cellpadding=15>

Cellspacing

The "cellspacing" tag specifies (in pixels) the amount of space between each cell. Use it within the "table" tag:

Example 1: <table border=1 cellspacing=5>

Example 2: <table border=1 cellspacing=15>

Table Headings

To create a bold and centered "heading" for a column or row within a table, use the <th> tag in place of a <td> tag in the coding for your first row.

Example:

<table border=1>
<tr><th>Column 1</th>    
<th>Column 2</th></tr>   
<tr><td>A</td>    
<td>B</td></tr>   
<tr><td>C</td>    
<td>D</td></tr>  
</table>

In the next section, we'll look at alignment and cell padding.

Alignment and Cell Padding

By default, all cell contents within a table (with the exception of table headings) align vertically centered and left justified. To make the contents of a cell align a different way, apply the following tags within the <td>, <th> or <tr> tags:

For horizontal alignment, values can be left, right, or center:

Advertisement

Example: <tr align="center">

For vertical alignment, values can be top, bottom, or middle:

Example: <td valign="top">

You can also arrange the alignment of your entire table, to decide where it appears on the page. By inserting the tags <align="right"> or <align="left"> within the initial "table" tag, text will wrap around your table wherever it is located. Or, if you would like your table to stand alone without any wrap around text, use "division alignment" tags before and after your entire table.

Cell Spanning

"Spanning" occurs when one cell spans two or more other cells in the table.

For column spanning, the tag <colspan=value> is placed within the <td> tag where it applies. Here is a code example:

<table border=1>  
<tr><td colspan=2>This cell spans over two columns </td>    
<td>This cell spans over one column </td> </tr> 
<tr align="center"> <td>A </td> <td>B </td> <td>C </td> </tr>  
</table>

For row spanning, the tag <rowspan=value> is placed within the <td> tag where it applies. For example:

<table border=1> 
<tr><td rowspan=2>This cell spans over two rows </td>    
<td>A</td><td>B</td></tr><tr><td>C</td><td>D</td>   
</tr>  </table>

You can also apply many of the attributes we learned in the last chapter within your table, such as font size, type and color, inserting an image, making a list and adding a link. Just add the appropriate tag to the particular cell you would like to format, right after that cell's tag.

Experiment and practice with the variety of tools and tags you learned in this article. The creative possibilities are endless when it comes to using tables on a Web page. Stack images and borderless colored boxes to create seamless designs, or nest borderless tables within borderless tables, some with color, some without, to create eye-catching layouts. Web page design limits expand with a little imagination, creativity and the use of tables.

Creating Frames

Some Web designers use frames on their pages, for design purposes and to make a site more user friendly. Frames make it easier to navigate a site without losing your place, so to speak. You know that frames have been used when a portion of a Web page remains stationary and another portion of the same page changes when a link is clicked. To check out a Web page with frames, visit The Birch Aquarium.

In The Birch Aquarium page, the top and the very bottom of the page remain constant, while the middle portion changes according to the chosen link. This page is separated into three frames, meaning that three different HTML documents are being displayed at one time. You can choose how many sections you would like your page divided into, in what manner they will be divided and what HTML documents you want to include within each frame.

Advertisement

First, it is important to plan your page well. Consider the layout in terms of rows and columns. How many horizontal sections, or rows, do you want to display? How many vertical sections, or columns? How much room, either pixel or percentage wise, do you estimate each section will need?

The Frameset DocumentA frameset document is an HTML document that instructs the browser to arrange the Web page content in a particular way. In a frameset document, a "frameset" tag replaces the "body" tag.

You will begin the frameset document in the usual HTML format:

<html><head><title>Title</title></head>

Next, insert the "frameset" tag:

Example: <frameset rows="20%, 80%">

This tag indicates that the page will be divided into two sections, a top and a bottom, as indicated by the two values within the tag. If three rows were needed, you would include three values:

Example: <frameset rows="10%, 50%, 40%">

The number values tell the browser the amount of space, in the browser window, that each section is to occupy. You can use percentage values or pixel values. An "*" can also be used in place of a value, indicating that a particular section can use whatever space is available on the browser window:

Example: <frameset rows="100, *, 50">

This tag states that the page will be divided into three rows. The first (top) frame will occupy 100 pixels of space, the bottom frame will occupy 50 pixels of space and the middle frame will occupy whatever space is left in the browser window.

If your page is to be divided into columns, use the frameset tag for columns along with the number values:

Example: <frameset cols="200, *">

This tag tells the browser to divide the page into two columns. The left column will occupy 200 pixels of space. The right column will occupy whatever space remains in the browser window.

You can also combine frameset rows and frameset columns to create quite complicated layouts. The "nesting" of frameset documents is discussed later in this article.

Adding the Frame Source

If you have not done so already, go ahead and create the HTML documents that will occupy each frame on your page. You can use the HTML documents you created in the previous chapters.

Now you will add to your frameset document the "frame src" tags which will tell the browser which HTML documents to place in each frame:

Advertisement

Example:

<html><head><title>Frameset Test</title></head>   <frameset cols="200,*">    

<frame src="links.htm"> <frame src="information.htm"> </frameset> </html> 

This example shows a frameset document which will divide a Web page into two columns, or frames. In the left frame, 200 pixels of space will display the document "links.htm." The rest of the page, the right column, will display the document "information.htm." You can also see the tags used to close a frameset document:

</frameset>

</html>

Naming Your Frames

Usually, a Web page contains frames in order to show, or link to, additional information located within the same site. The site The Birch Aquarium is an example of frames being used to link to information within the same site. The menu bar of links pulls information into the middle frame of the Web page when a link is clicked, without disturbing the outer frames of the page.

In order to let the browser know which frame to place the linked information into, you must "name" your frames. If you do not specify which frame is to receive the new information, the menu frame of links will be replaced with the linked information itself, destroying the look and purpose of your framed page.

To name a frame, just place a "name" tag within the "frame src" tag in your frameset document. You can give each frame any name you choose.

Example:

<frame src="links.htm" name="menu">

<frame src="information.htm" name="info">

After you name a frame, you can specify which frame you would like the linked information to be placed into by adding the "target" tag, followed by the name of the frame.

Example: <a href="https://www.howstuffworks.com/company.htm" target="info"> Company Information </a>

This tells the browser to display the linked information into the frame named "info."

Saving and Viewing Your Document

Like regular HTML documents, frameset documents are saved with either .htm or .html extensions. Be sure to keep the frameset file in the same folder as the HTML documents that will appear in its frames.

When you open your frameset document in your browser, you should be able to see a divided screen with a separate HTML document within each frame.

In the next section we'll find out how to remove the scroll bars and borders.

Removing Scroll Bars and Borders

Simple page with "nested" frames

If you prefer a "clean" look to your page, free of any scrollbars and borders, you can specify this with tags placed within your "frame src" tag.

Remove scrollbars by adding the tag "scrolling=no."

Advertisement

Example: <frame src="links.htm" scrolling=no>

Remove borders by adding the tag "frameborder=0."

Example: <frame src="links.htm" frameborder=0>

You can also specify the margin width and height of each frame by adding the tags "marginwidth=value" and "marginheight=value." You can make the margins any pixel value you wish. Again, insert these tags within the "frame src" tag.

Multiple Frames

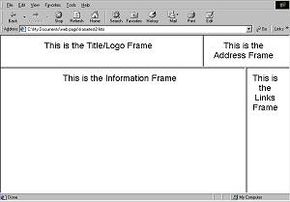
A variety of rows and columns of frames can be combined, creating frameset documents set within other frameset documents. The organization of tags necessary to achieve this effect can be quite complex. See the image at the top of the page for an example of a simple page with "nested" frames.

The frameset document created for this layout is:

<html><head><title>Frame Test</title></head>   <frameset rows="20%, 80%">  

<frameset cols="70%, 30%"> <frame src="logo.htm"> <frame src="address.htm">

</frameset> <frameset cols="85%, 15%> <frame src="info.htm">

<frame src="links.htm"> </frameset> </frameset> <html> 

Broken down, this is what each row of "frame" tags indicates:

<frameset rows="20%, 80%">

There are two rows within this document. The top row occupies 20 percent of the available vertical space. The bottom row occupies 80 percent. In effect, these values specify the height of each row.

<frameset cols="70%, 30%">

There are two columns within the first row. The left column occupies 70 percent of the available horizontal space and the right column occupies 30 percent. In effect, these values specify the width of each column.

<frame src="logo.htm">

The HTM document "logo" will appear in the first column of the first row.

<frame src="address.htm">

The HTM document "address" will appear in the second column of the first row.

</frameset>

The first column frameset is complete.

<frameset cols="85%, 15%>

There are two columns within the second row. The left column occupies 85 percent of the available horizontal space. The right column occupies 15 percent.

<frame src="info.htm">

The HTM document "info" will appear in the first column of the second row.

<frame src="links.htm">

The HTM document "links" will appear in the second column of the second row.

</frameset>

The second column frameset is complete.

</frameset>

The entire frameset is complete.

Frames are a great tool you can use to make your Web page even more eye-catching and dynamic. They allow you to maintain certain aspects of your page even as a user clicks on a link to another part of your site, or to another site entirely. To continue building the Web page of your dreams, check out the next section on images.

Images

Once you start creating pages, one of the first things you will want to add is graphics. Humans are visual animals, and graphics can totally change the character of a page.

Once you start creating pages, one of the first things you will want to add is graphics. Humans are visual animals, and graphics can totally change the character of a page. You can use tiny graphics, long thin graphics, larger images or even animations.

Advertisement

Turn a graphic into a bullet by simply inserting the image tag where you want the bullet to display; you needn't use the <ul> tag.

Long, thin graphics can be used as separators. Larger graphics can be used for logos or illustrations -- pretty much anything you can think of.

There are two ways you can obtain graphical images: Either you can download them from various "free clip art" sites on the Web, or you can create them yourself. Some sites offering free graphics and animations include Page Works, A-1 All Free Clip Art, and The Free Graphics Store. You can also visit The Free Site, Web Places and Free Graphics for directories of free image sites.

Let's say you go to a free graphics site and you see an image you like. If you right-click on the image, a menu will pop up and one of the options will be "Save image as...." You should save the image in the directory that your Web page is in.

If you want to create your own images, you will need a program that can edit GIF and JPG files. One very popular image-editing program available on the Web is called Paint Shop Pro. You can obtain a copy by clicking here. With a little practice, and only minor artistic ability, you will soon be creating images like a pro!

As described in Basic HTML Formatting Tags, images are inserted into a Web page with the tag:

<img src="name of file">

You can also use an image as a link to another page or element. To do so, simply insert the "img src" tag after the anchor tag. Be sure to include "border=0" or else an ugly border will appear around your image.

Example: <a href="https://www.howstuffworks.com"><img src="hswlogo.jpg" border=0></a>

In this example, if users clicked on the image "hswlogo.jpg," they would be transported to the HowStuffWorks homepage at "https://www.howstuffworks.com."

Any digital image can also be used as a background for your page. To do so, add background="image file name" within the <body> tag.

Example: <body background="hsw-logo.jpg>

We'll find out how to label images in the next section.

Labeling Images

Another useful, but not mandatory, tag that you can add to your image tag is "alt." This tag gives your image a label, appearing when the user passes the mouse over the graphic. It also appears before the image appears as your page is loading in the browser, holding the user's interest while the graphic is coming up. You can insert any message you want using the "alt" tag.

Example: <img src="hswlogo.jpg" alt="HSW Company Information">

Advertisement

If Your Images Don't Work...

We get a fair amount of e-mail from people having trouble adding images to their pages. When GIFs and JPGs don't work, they usually show up as a small red X.

When you see this problem on your pages, it means one thing: you have not typed in the correct file name for the image. Here are some steps you can take to correct the problem:

  • Start by simplifying the process. Put the HTML file and the image file in the same directory. Rename the image file to xyz.gif (or xyz.jpg). Create a tag that says in your HTML page. Display the page in your browser. If you still see the red X instead of the image, then...
  • Check to make sure the renamed file is really named xyz.gif. On a UNIX machine, case matters, so make sure everything that should be uppercase is uppercase, and everything that should be lowercase is lowercase. The name Xyz.gif is entirely different from xyz.gif to a UNIX machine.
  • On a Windows machine, the operating system will sometimes add a suffix to the file name without telling you. For example, you might see xyz.gif in the Explorer, but Windows may have named the file xyz.gif.gif. The easiest way to see if this has happened is to use the dir command in the MS-DOS prompt, so that you are seeing the real file names. If Windows is in fact adding suffixes, you can simply turn off that behavior using the options dialog in the explorer.

We'll find out how to align your images in the next section.

Aligning Images

The horizontal alignment of images on your page is formatted using the tags and techniques described in the justification section. Here's a quick review:

  • Use the <div align=.".."> tag before the image tag to center or justify right or left.
  • Use the </div> tag after the image tag to end the justification.
  • Use the <align=.".."> tag within the "img src" tag to have text wrap around the image.

Insert these tags within the "img src" tag for the vertical alignment of images in relation to text:

Advertisement

align="bottom" The text lines up with the bottom of the image.

<img src="https://cdn.hswstatic.com/gif/hsw-logo3.gif" alt="HowStuffWorks" border=0 align="bottom"

align="top" The text lines up with the top of the image.

<img src="https://cdn.hswstatic.com/gif/hsw-logo3.gif" alt="HowStuffWorks" border=0 align="top"

align="middle" The text lines up alongside the middle of the image. 

<img src="https://cdn.hswstatic.com/gif/hsw-logo3.gif" alt="HowStuffWorks" border=0 align="middle">

In each of the above examples, the image is justified left by default, so the text appears on its right side. If you want the text on the left and the image on the right, you can add the <div align> image alignment tag discussed above. 

Creating Animated GIFs

Animated GIFs add movement and flash to your pages. A good tool for creating animated GIFs is The GIF Construction Set. Using this tool, or another tool like it, you can create different frames in an animated sequence and then roll them up into a single image.

Getting Your Page Online

Once you create a stellar Web page, you will want to put it on a Web server for all the world to see. Many services and institutions with Web servers offer free space to post your pages. AOL offers free space to their members, and many colleges offer space to their students. There are also many commercial sites that offer free space. The only drawback to these options is that you will most likely have to display the site's advertisement banner on top of or within your page. Here are a few of these free commercial sources:

You also have the option of paying a hosting service for Web space. Most professional sites go this route. Hosting services can provide their clients with large amounts of space, special options and reliability. Using a hosting service also gives you the ability to use a domain name, your own unique URL.

Advertisement

If you are interested in obtaining your own domain name, visit the Accredited Registrars page at ICANN.org, the agency that maintains IP addresses and domain registry. At any of the listed Web sites, you can check on the availability of domain names you are considering and purchase one that appeals to you. The cost for an annual contract is usually less if you have a hosting service in place, so when you become serious about purchasing a domain name, contact a hosting service first. Most hosting services will also register your domain name for you, providing Network Solutions with IP numbers and other information they will need.

There are a wide variety of hosting services available at a wide range of costs. Be wary of the many "too good to be true" offers. You could be faced with slow servers, down-time, no support and flash-in-the-pan businesses.

Great Tools Once you get your page on a server, you will want to know what kind of traffic you are getting. A place like Show Stat, Hit Box, or Site Meter provides that service for free and gives you very complete statistics. If you just want a simple counter on your page, FastCounter is a good tool to use.

There are a number of tools you can use to help make your site better. For example, this free tool will check your site for spelling errors, load time over the network, meta tags, browser compatibility, etc.

We'll learn about meta tags in the next section.

Meta Tags

If you are planning to enter your pages into search engines (addressed in the next section) so that other people can find them, you will want to add Meta tags to your page. The two most common Meta tags let you specify a description and a set of keywords for the page, respectively, and you can also declare all sorts of other things. Meta tags always appear between the <HEAD> and </HEAD> tags of the HTML source. Here are the Meta tags that appear at the top of the main index page for HowStuffWorks:

<Meta Name="Description" Content="The index to over 50 fantastic 'HowStuffWorks' articles!">

Advertisement

<Meta Name="keywords" Content="how stuff works, how things work, the way things work, information, tutorials, explanation, explains, understand, understanding, tell me, students, teachers, study, educational">

<Meta http-equiv="PICS-Label" content='(PICS-1.1 "http://www.rsac.org/ratingsv01.html" l gen true comment "RSACi North America Server" for "https://www.howstuffworks.com" on "1998.09.23T01:29-0800" r (n 0 s 0 v 0 l 0))'>

The first tag is a description for the page. Search engines use this text directly in their listings. If you don't have a description meta tag, then the search engine either leaves your description blank or uses the first sentence or two from your page.

The second tag indicates a set of extra keywords for the page. Search engines normally index every word on a page, but in many cases you will not use a certain word, in your actual text, that might be used by someone searching for your page. If you know that people frequently misspell a given word, then you might also put the misspelling in the keyword list.

The third tag is an RSAC rating tag. Here is a description of what the RSAC rating system does, taken from the RSAC Web site at www.rsac.org:

"The Recreational Software Advisory Council is an independent, non-profit organization based in Washington, D.C, that empowers the public, especially parents, to make informed decisions about electronic media by means of an open, objective, content advisory system. The RSACi system provides consumers with information about the level of sex, nudity, violence, offensive language (vulgar or hate-motivated) in software games and Web sites. To date, RSACi has been integrated into Microsoft's browser, Internet Explorer and MicroSystem's Cyber Patrol Software. CompuServe (US and Europe) has also committed to rate all its content with the RSACi system."

Some browsers are configured to block pages that are not rated, so by rating your site you avoid problems with those browsers. By rating your site with RSAC you also let people know exactly what kind of content you are providing.

There are a number of other tags you will commonly see if you look at the HTML source of other pages on the Web. Many HTML tools put in tags automatically. For example, here are two tags that Microsoft Word automatically applies to a page if you use Microsoft Word to create HTML:

<META HTTP-EQUIV="Content-Type" CONTENT="text/html; charset=windows-1252">

<META NAME="Generator" CONTENT="Microsoft Word 97">

In all cases, meta tags do not affect the way your page displays in a browser. The description and keywords tags are the most commonly used.

Promoting Your Site

After you have spent hours creating your site, and have posted it on a server, you really want people to come look at it. But in order to get people to visit your site, you have to promote it. Very few people will find your site by accident -- something has to lead them there.

There are many different techniques you can use to draw people to your site. This chapter will teach you many of the angles you can use to increase site traffic.

Advertisement

Registering With Search Engines

Search engines read a Web page and index all of the words from the page. Users of the search engines can find your page by searching for keywords. The good thing about search engines is that they let you find everything that contains a certain word, or set of words. The bad thing about search engines is that they generally return a lot of chaff with the wheat.

From a Web promotion standpoint, the nice thing about search engines is that it is easy to get your site listed on them. Each search engine includes somewhere on its page a "submit a site" link, or something along those lines. Using this link, you will be able to complete a form (some lengthier than others) which requests to have your site listed with them. Your site will not be added immediately, and sometimes it will take several submissions over a period of time before your site is listed. Each search engine is different. Also, be sure to submit each one of your pages individually to make sure that the keywords from each separate page are incorporated.

Here is a list of the URLs to some of the major search engines' "submit-a-site" pages:

Registering With Link Sites A link site lists various sites in some sort of hierarchical structure. Each site is placed in a category and given a short description. Yahoo is the best example of this sort of site, but there are now many others trying to do the same sort of thing in different ways.

Most of these sites are very slow to pick up new sites, because people must review each submitted site before it can be added to the collection of links. The following links point to the home pages of each of these link sites, because you have to review the site to figure out the category for your submission before you can add your URL. Once you find the proper category, look for an "Add URL" button to add your site.

We'll look at the different kinds of listing services in the next section.

Listing Services

If your site is business-related, you should submit it to all of the following sites. These sites will list your business in their directories, some for free and some for a fee:

Registering for Awards Sites Award sites either present your site to the world (typically for an hour or a day as a unique or "Cool" site), or they give your site some sort of award that you can display in the form of a logo pasted on your site. In all cases, you must register with these sites in order to be considered for recognition. The following sites are some of the most popular award sites available:

Advertisement

Registration Services The companies listed below will register your site on hundreds of search engines, sometimes for a fee. Most of them also offer other Web promotion services as well. Several of these sites offer information on promoting your site yourself, so you might want to visit them to see if you can pick up ideas.

The key thing to recognize, especially when considering whether or not to use these services for search engine registration, is that they are doing nothing that you can't do yourself. You can register your site just as well as they can, and all you need to know is in this series. It is simply a question of how best to use your time.

We'll look at reciprocal linking in the next section.

Reciprocal Linking

Example banner ad

Reciprocal linking is an "I'll scratch your back if you'll scratch mine" activity. The idea is to locate sites related to yours and send them e-mail asking them to link to you. In return, you generally offer to link back to them.

The best way to set up reciprocal links is to simply browse the Web looking for related sites and send e-mail to them. You will find that the response rate is perhaps 25 percent. But it can't hurt to try, and the more links you have on the Web the more traffic you will get. One link in exactly the right place can make a BIG difference in the traffic that a new site receives.

Advertisement

The following are a couple of resources for creating reciprocal links:

Paid Advertising

If you need traffic fast, one of the best ways to get it is to pay high-traffic sites to advertise your service. Paid advertisements typically appear as long, thin, blinking ads at the top of Web pages, and they are called banner ads (there are lots of other types of ads, though -- check out How Web Advertising Works for details). Here are three examples of banner ads:

Most larger sites, with traffic in the range of 10,000 or more visitors a day, have standard advertising programs. A typical rate is something in the area of $15 to $70 per 1,000 presentations of your ad. The key is to find a site that will let you target your advertisements specifically to people who will be interested in your message.

For lots of information about banner ads, see How Banner Ads Work. The following links offer information on the advertising programs of some of the larger search engines. Most search engines offer some form of advertising -- look around on the home page and you will generally find a link to information about advertising on the site:

More Information on Web Site Promotion

The following articles will be useful in learning more about Web site promotion and marketing:

Ideas

To get more information about Web pages, you can glean information from Web pages that look good to you by using the "View Source" feature. If you find a Web page you like, you can look at the HTML code for the page and see how they created it. This is a great way to learn new HTML techniques.

If you want to look at a collection of visually stunning sites to get some ideas for your pages, try visiting the Affluent Lifestyles page. This page links to about 100 sites -- and many of them are spectacular. See in particular the sites assembled by automobile and jewelry manufacturers. When you find a look you like, view the HTML source for that page.

Advertisement

For tons more information on HTML, Web pages and related topics, check out the links on the next page.