3-D images start out as a simple shape called a wireframe.
2008 HowStuffWorks
You're probably reading this on the screen of a computer monitor -- a display that has two real dimensions, height and width. But when you look at a movie like "Toy Story II" or play a game like TombRaider, you see a window into a three-dimensional world. One of the truly amazing things about this window is that the world you see can be the world we live in, the world we will live in tomorrow, or a world that lives only in the minds of a movie’s or game's creators. And all of these worlds can appear on the same screen you use for writing a report or keeping track of a stock portfolio.
How does your computer trick your eyes into thinking that the flat screen extends deep into a series of rooms? How do game programmers convince you that you're seeing real characters move around in a real landscape? We will tell you about some of the visual tricks 3-D graphic designers use, and how hardware designers make the tricks happen so fast that they seem like a movie that reacts to your every move.
A picture that has or appears to have height, width and depth is three-dimensional (or 3-D). A picture that has height and width but no depth is two-dimensional (or 2-D). Some pictures are 2-D on purpose. Think about the international symbols that indicate which door leads to a restroom, for example. The symbols are designed so that you can recognize them at a glance. That’s why they use only the most basic shapes. Additional information on the symbols might try to tell you what sort of clothes the little man or woman is wearing, the color of their hair, whether they get to the gym on a regular basis, and so on, but all of that extra information would tend to make it take longer for you to get the basic information out of the symbol: which restroom is which. That's one of the basic differences between how 2-D and 3-D graphics are used: 2-D graphics are good at communicating something simple, very quickly. 3-D graphics tell a more complicated story, but have to carry much more information to do it.
For example, triangles have three lines and three angles -- all that's needed to tell the story of a triangle. A pyramid, however is a 3-D structure with four triangular sides. Note that it takes five lines and six angles to tell the story of a pyramid -- nearly twice the information required to tell the story of a triangle.
Advertisement
For hundreds of years, artists have known some of the tricks that can make a flat, 2-D painting look like a window into the real, 3-D world. You can see some of these on a photograph that you might scan and view on your computer monitor: Objects appear smaller when they're farther away; when objects close to the camera are in focus, objects farther away are fuzzy; colors tend to be less vibrant as they move farther away. When we talk about 3-D graphics on computers today, though, we're not talking about still photographs -- we're talking about pictures that move.
If making a 2-D picture into a 3-D image requires adding a lot of information, then the step from a 3-D still picture to images that move realistically requires far more. Part of the problem is that we’ve gotten spoiled. We expect a high degree of realism in everything we see. In the mid-1970s, a game like "Pong" could impress people with its on-screen graphics. Today, we compare game screens to DVD movies, and want the games to be as smooth and detailed as what we see in the movie theater. That poses a challenge for 3-D graphics on PCs, Macintoshes, and, increasingly, game consoles like the Dreamcast and the Playstation II.
Advertisement
What Are 3-D Graphics?
For many of us, games on a computer or advanced game system are the most common ways we see 3-D graphics. These games, or movies made with computer-generated images, have to go through three major steps to create and present a realistic 3-D scene:
Creating a virtual 3-D world.
Determining what part of the world will be shown on the screen.
Determining how every pixel on the screen will look so that the whole image appears as realistic as possible.
Creating a Virtual 3-D World
A virtual 3-D world isn't the same thing as one picture of that world. This is true of our real world also. Take a very small part of the real world -- your hand and a desktop under it. Your hand has qualities that determine how it can move and how it can look. The finger joints bend toward the palm, not away from it. If you slap your hand on the desktop, the desktop doesn't splash -- it's always solid and it's always hard. Your hand can't go through the desktop. You can't prove that these things are true by looking at any single picture. But no matter how many pictures you take, you will always see that the finger joints bend only toward the palm, and the desktop is always solid, not liquid, and hard, not soft. That's because in the real world, this is the way hands are and the way they will always behave. The objects in a virtual 3-D world, though, don’t exist in nature, like your hand. They are totally synthetic. The only properties they have are given to them by software. Programmers must use special tools and define a virtual 3-D world with great care so that everything in it always behaves in a certain way.
Advertisement
What Part of the Virtual World Shows on the Screen?
At any given moment, the screen shows only a tiny part of the virtual 3-D world created for a computer game. What is shown on the screen is determined by a combination of the way the world is defined, where you choose to go and which way you choose to look. No matter where you go -- forward or backward, up or down, left or right -- the virtual 3-D world around you determines what you will see from that position looking in that direction. And what you see has to make sense from one scene to the next. If you're looking at an object from the same distance, regardless of direction, it should look the same height. Every object should look and move in such a way as to convince you that it always has the same mass, that it's just as hard or soft, as rigid or pliable, and so on.
Programmers who write computer games put enormous effort into defining 3-D worlds so that you can wander in them without encountering anything that makes you think, “That couldn't happen in this world!" The last thing you want to see is two solid objects that can go right through each other. That’s a harsh reminder that everything you’re seeing is make-believe.
The third step involves at least as much computing as the other two steps and has to happen in real time for games and videos. We'll take a longer look at it next.
Advertisement
How to Make It Look Like the Real Thing
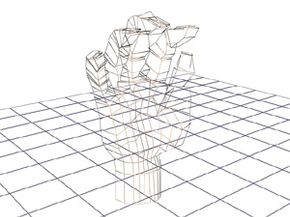
This illustration shows the wireframe of a hand made from relatively few polygons -- 862 total.
HowStuffWorks.com
No matter how large or rich the virtual 3-D world, a computer can depict that world only by putting pixels on the 2-D screen. This section will focus on just how what you see on the screen is made to look realistic, and especially on how scenes are made to look as close as possible to what you see in the real world. First we'll look at how a single stationary object is made to look realistic. Then we'll answer the same question for an entire scene. Finally, we'll consider what a computer has to do to show full-motion scenes of realistic images moving at realistic speeds.
A number of image parts go into making an object seem real. Among the most important of these are shapes, surface textures, lighting, perspective, depth of field and anti-aliasing.
Advertisement
Shapes
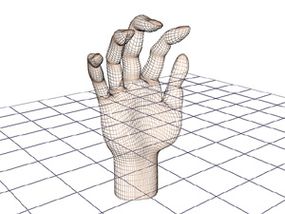
The outline of the wireframe can be made to look more natural and rounded, but many more polygons -- 3,444 -- are required.
HowStuffWorks.com
When we look out our windows, we see scenes made up of all sorts of shapes, with straight lines and curves in many sizes and combinations. Similarly, when we look at a 3-D graphical image on our computer monitor, we see images made up of a variety of shapes, although most of them are made up of straight lines. We see squares, rectangles, parallelograms, circles and rhomboids, but most of all we see triangles. However, in order to build images that look as though they have the smooth curves often found in nature, some of the shapes must be very small, and a complex image -- say, a human body -- might require thousands of these shapes to be put together into a structure called a wireframe. At this stage the structure might be recognizable as the symbol of whatever it will eventually picture, but the next major step is important: The wireframe has to be given a surface.
Surface Textures
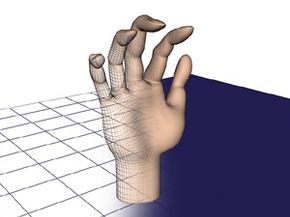
Adding a surface to the wireframe begins to change the image from something obviously mathematical to a picture we might recognize as a hand.
HowStuffWorks.com
When we meet a surface in the real world, we can get information about it in two key ways. We can look at it, sometimes from several angles, and we can touch it to see whether it's hard or soft. In a 3-D graphic image, however, we can only look at the surface to get all the information possible. All that information breaks down into three areas:
Color: What color is it? Is it the same color all over?
Texture: Does it appear to be smooth, or does it have lines, bumps, craters or some other irregularity on the surface?
Reflectance: How much light does it reflect? Are reflections of other items in the surface sharp or fuzzy?
One way to make an image look "real" is to have a wide variety of these three features across the different parts of the image. Look around you now: Your computer keyboard has a different color/texture/reflectance than your desktop, which has a different color/texture/reflectance than your arm. For realistic color, it’s important for the computer to be able to choose from millions of different colors for the pixels making up an image. Variety in texture comes both from mathematical models for surfaces ranging from frog skin to Jell-o gelatin to stored “texture maps” that are applied to surfaces. We also associate qualities that we can't see -- soft, hard, warm, cold -- with particular combinations of color, texture and reflectance. If one of them is wrong, the illusion of reality is shattered.
We'll take a look at lighting and perspective in the next section.
Advertisement
Lighting and Perspective
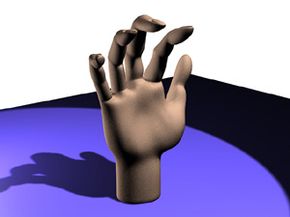
Lighting in an image not only adds depth to the object through shading, it “anchors” objects to the ground with shadows.
When you walk into a room, you turn on a light. You probably don't spend a lot of time thinking about the way the light comes from the bulb or tube and spreads around the room. But the people making 3-D graphics have to think about it, because all the surfaces surrounding the wireframes have to be lit from somewhere. One technique, called ray-tracing, plots the path that imaginary light rays take as they leave the bulb, bounce off of mirrors, walls and other reflecting surfaces, and finally land on items at different intensities from varying angles. It's complicated enough when you think about the rays from a single light bulb, but most rooms have multiple light sources -- several lamps, ceiling fixtures, windows, candles and so on.
Lighting plays a key role in two effects that give the appearance of weight and solidity to objects: shading and shadows. The first, shading, takes place when the light shining on an object is stronger on one side than on the other. This shading is what makes a ball look round, high cheekbones seem striking and the folds in a blanket appear deep and soft. These differences in light intensity work with shape to reinforce the illusion that an object has depth as well as height and width. The illusion of weight comes from the second effect -- shadows.
Advertisement
Solid bodies cast shadows when a light shines on them. You can see this when you observe the shadow that a sundial or a tree casts onto a sidewalk. And because we’re used to seeing real objects and people cast shadows, seeing the shadows in a 3-D image reinforces the illusion that we’re looking through a window into the real world, rather than at a screen of mathematically generated shapes.
Perspective
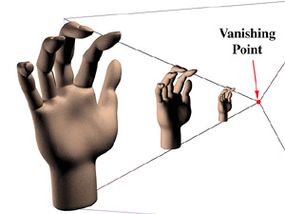
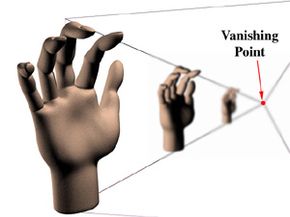
Perspective is one of those words that sounds technical but that actually describes a simple effect everyone has seen. If you stand on the side of a long, straight road and look into the distance, it appears as if the two sides of the road come together in a point at the horizon. Also, if trees are standing next to the road, the trees farther away will look smaller than the trees close to you. As a matter of fact, the trees will look like they are converging on the point formed by the side of the road. When all of the objects in a scene look like they will eventually converge at a single point in the distance, that's perspective. There are variations, but most 3-D graphics use the "single point perspective" just described.
In the illustration, the hands are separate, but most scenes feature some items in front of, and partially blocking the view of, other items. For these scenes the software not only must calculate the relative sizes of the items but also must know which item is in front and how much of the other items it hides. The most common technique for calculating these factors is the Z-Buffer. The Z-buffer gets its name from the common label for the axis, or imaginary line, going from the screen back through the scene to the horizon. (There are two other common axes to consider: the x-axis, which measures the scene from side to side, and the y-axis, which measures the scene from top to bottom.)
The Z-buffer assigns to each polygon a number based on how close an object containing the polygon is to the front of the scene. Generally, lower numbers are assigned to items closer to the screen, and higher numbers are assigned to items closer to the horizon. For example, a 16-bit Z-buffer would assign the number -32,768 to an object rendered as close to the screen as possible and 32,767 to an object that is as far away as possible.
In the real world, our eyes can’t see objects behind others, so we don’t have the problem of figuring out what we should be seeing. But the computer faces this problem constantly and solves it in a straightforward way. As each object is created, its Z-value is compared to that of other objects that occupy the same x- and y-values. The object with the lowest z-value is fully rendered, while objects with higher z-values aren’t rendered where they intersect. The result ensures that we don’t see background items appearing through the middle of characters in the foreground. Since the z-buffer is employed before objects are fully rendered, pieces of the scene that are hidden behind characters or objects don’t have to be rendered at all. This speeds up graphics performance. Next, we'll look at the depth of field element.
Advertisement
Depth of Field
Another optical effect successfully used to create 3-D is depth of field. Using our example of the trees beside the road, as that line of trees gets smaller, another interesting thing happens. If you look at the trees close to you, the trees farther away will appear to be out of focus. And this is especially true when you're looking at a photograph or movie of the trees. Film directors and computer animators use this depth of field effect for two purposes. The first is to reinforce the illusion of depth in the scene you're watching. It's certainly possible for the computer to make sure that every item in a scene, no matter how near or far it's supposed to be, is perfectly in focus. Since we're used to seeing the depth of field effect, though, having items in focus regardless of distance would seem foreign and would disturb the illusion of watching a scene in the real world.
The second reason directors use depth of field is to focus your attention on the items or actors they feel are most important. To direct your attention to the heroine of a movie, for example, a director might use a "shallow depth of field," where only the actor is in focus. A scene that's designed to impress you with the grandeur of nature, on the other hand, might use a "deep depth of field" to get as much as possible in focus and noticeable.
Advertisement
Anti-aliasing
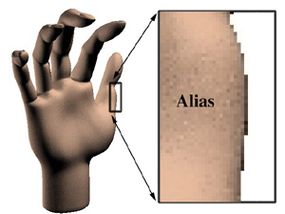
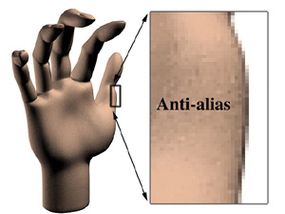
A technique that also relies on fooling the eye is anti-aliasing. Digital graphics systems are very good at creating lines that go straight up and down the screen, or straight across. But when curves or diagonal lines show up (and they show up pretty often in the real world), the computer might produce lines that resemble stair steps instead of smooth flows. So to fool your eye into seeing a smooth curve or line, the computer can add graduated shades of the color in the line to the pixels surrounding the line. These "grayed-out" pixels will fool your eye into thinking that the jagged stair steps are gone. This process of adding additional colored pixels to fool the eye is called anti-aliasing, and it is one of the techniques that separates computer-generated 3-D graphics from those generated by hand. Keeping up with the lines as they move through fields of color, and adding the right amount of "anti-jaggy" color, is yet another complex task that a computer must handle as it creates 3-D animation on your computer monitor.
The jagged “stair steps” that occur when images are painted from pixels in straight lines mark an object as obviously computer-generated.Drawing gray pixels around the lines of an image -- “blurring” the lines -- minimizes the stair steps and makes an object appear more realistic.
We'll find out how to animate 3-D images in the coming sections.
Advertisement
Realistic Examples
When all the tricks we've talked about so far are put together, scenes of tremendous realism can be created. And in recent games and films, computer-generated objects are combined with photographic backgrounds to further heighten the illusion. You can see the amazing results when you compare photographs and computer-generated scenes.
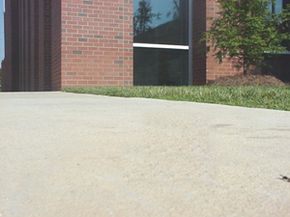
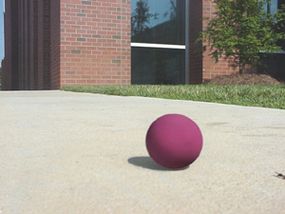
This is a photograph of a sidewalk near the How Stuff Works office. In one of the following images, a ball was placed on the sidewalk and photographed. In the other, an artist used a computer graphics program to create a ball.
Advertisement
Image AImage B
Can you tell which is the real ball? Look for the answer at the end of the article.
Advertisement
Making 3-D Graphics Move
So far, we've been looking at the sorts of things that make any digital image seem more realistic, whether the image is a single "still" picture or part of an animated sequence. But during an animated sequence, programmers and designers will use even more tricks to give the appearance of "live action" rather than of computer-generated images.
How many frames per second?
When you go to see a movie at the local theater, a sequence of images called frames runs in front of your eyes at a rate of 24 frames per second. Since your retina will retain an image for a bit longer than 1/24th of a second, most people's eyes will blend the frames into a single, continuous image of movement and action.
Advertisement
If you think of this from the other direction, it means that each frame of a motion picture is a photograph taken at an exposure of 1/24 of a second. That's much longer than the exposures taken for "stop action" photography, in which runners and other objects in motion seem frozen in flight. As a result, if you look at a single frame from a movie about racing, you see that some of the cars are "blurred" because they moved during the time that the camera shutter was open. This blurring of things that are moving fast is something that we're used to seeing, and it's part of what makes an image look real to us when we see it on a screen.
However, since digital 3-D images are not photographs at all, no blurring occurs when an object moves during a frame. To make images look more realistic, blurring has to be explicitly added by programmers. Some designers feel that "overcoming" this lack of natural blurring requires more than 30 frames per second, and have pushed their games to display 60 frames per second. While this allows each individual image to be rendered in great detail, and movements to be shown in smaller increments, it dramatically increases the number of frames that must be rendered for a given sequence of action. As an example, think of a chase that lasts six and one-half minutes. A motion picture would require 24 (frames per second) x 60 (seconds) x 6.5 (minutes) or 9,360 frames for the chase. A digital 3-D image at 60 frames per second would require 60 x 60 x 6.5, or 23,400 frames for the same length of time.
Creative Blurring
The blurring that programmers add to boost realism in a moving image is called "motion blur" or "spatial anti-aliasing." If you've ever turned on the "mouse trails" feature of Windows, you've used a very crude version of a portion of this technique. Copies of the moving object are left behind in its wake, with the copies growing ever less distinct and intense as the object moves farther away. The length of the trail of the object, how quickly the copies fade away and other details will vary depending on exactly how fast the object is supposed to be moving, how close to the viewer it is, and the extent to which it is the focus of attention. As you can see, there are a lot of decisions to be made and many details to be programmed in making an object appear to move realistically.
There are other parts of an image where the precise rendering of a computer must be sacrificed for the sake of realism. This applies both to still and moving images. Reflections are a good example. You've seen the images of chrome-surfaced cars and spaceships perfectly reflecting everything in the scene. While the chrome-covered images are tremendous demonstrations of ray-tracing, most of us don't live in chrome-plated worlds. Wooden furniture, marble floors and polished metal all reflect images, though not as perfectly as a smooth mirror. The reflections in these surfaces must be blurred -- with each surface receiving a different blur -- so that the surfaces surrounding the central players in a digital drama provide a realistic stage for the action.
Advertisement
Fluid Motion for Us Is Hard Work for the Computer
All the factors we've discussed so far add complexity to the process of putting a 3-D image on the screen. It's harder to define and create the object in the first place, and it's harder to render it by generating all the pixels needed to display the image. The triangles and polygons of the wireframe, the texture of the surface, and the rays of light coming from various light sources and reflecting from multiple surfaces must all be calculated and assembled before the software begins to tell the computer how to paint the pixels on the screen. You might think that the hard work of computing would be over when the painting begins, but it's at the painting, or rendering, level that the numbers begin to add up.
Today, a screen resolution of 1024 x 768 defines the lowest point of "high-resolution." That means that there are 786,432 picture elements, or pixels, to be painted on the screen. If there are 32 bits of color available, multiplying by 32 shows that 25,165,824 bits have to be dealt with to make a single image. Moving at a rate of 60 frames per second demands that the computer handle 1,509,949,440 bits of information every second just to put the image onto the screen. And this is completely separate from the work the computer has to do to decide about the content, colors, shapes, lighting and everything else about the image so that the pixels put on the screen actually show the right image. When you think about all the processing that has to happen just to get the image painted, it's easy to understand why graphics display boards are moving more and more of the graphics processing away from the computer's central processing unit (CPU). The CPU needs all the help it can get.
Advertisement
Transforms and Processors: Work, Work, Work
Looking at the number of information bits that go into the makeup of a screen only gives a partial picture of how much processing is involved. To get some inkling of the total processing load, we have to talk about a mathematical process called a transform. Transforms are used whenever we change the way we look at something. A picture of a car that moves toward us, for example, uses transforms to make the car appear larger as it moves. Another example of a transform is when the 3-D world created by a computer program has to be "flattened" into 2-D for display on a screen. Let's look at the math involved with this transform -- one that's used in every frame of a 3-D game -- to get an idea of what the computer is doing. We'll use some numbers that are made up but that give an idea of the staggering amount of mathematics involved in generating one screen. Don't worry about learning to do the math. That has become the computer's problem. This is all intended to give you some appreciation for the heavy-lifting your computer does when you run a game.
The first part of the process has several important variables:
Advertisement
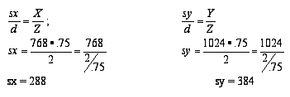
X = 758 -- the height of the "world" we're looking at.
Y = 1024 -- the width of the world we're looking at
Z = 2 -- the depth (front to back) of the world we're looking at
Sx = height of our window into the world
Sy - width of our window into the world
Sz = a depth variable that determines which objects are visible in front of other, hidden objects
D = .75 -- the distance between our eye and the window in this imaginary world.
First, we calculate the size of the windows into the imaginary world.
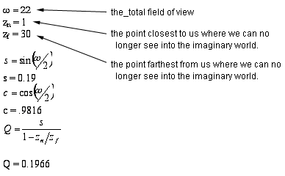
Now that the window size has been calculated, a perspective transform is used to move a step closer to projecting the world onto a monitor screen. In this next step, we add some more variables.
So, a point (X, Y, Z, 1.0) in the three-dimensional imaginary world would have transformed position of (X', Y', Z', W'), which we get by the following equations:
At this point, another transform must be applied before the image can be projected onto the monitor's screen, but you begin to see the level of computation involved -- and this is all for a single vector (line) in the image! Imagine the calculations in a complex scene with many objects and characters, and imagine doing all this 60 times a second. Aren't you glad someone invented computers?
In the example below, you see an animated sequence showing a walk through the new How Stuff Works office. First, notice that this sequence is much simpler than most scenes in a 3-D game. There are no opponents jumping out from behind desks, no missiles or spears sailing through the air, no tooth-gnashing demons materializing in cubicles. From the "what's-going-to-be-in-the-scene" point of view, this is simple animation. Even this simple sequence, though, deals with many of the issues we've seen so far. The walls and furniture have texture that covers wireframe structures. Rays representing lighting provide the basis for shadows. Also, as the point of view changes during the walk through the office, notice how some objects become visible around corners and appear from behind walls -- you're seeing the effects of the z-buffer calculations. As all of these elements come into play before the image can actually be rendered onto the monitor, it's pretty obvious that even a powerful modern CPU can use some help doing all the processing required for 3-D games and graphics. That's where graphics co-processor boards come in.
Advertisement
How Graphics Boards Help
Since the early days of personal computers, most graphics boards have been translators, taking the fully developed image created by the computer's CPU and translating it into the electrical impulses required to drive the computer's monitor. This approach works, but all of the processing for the image is done by the CPU -- along with all the processing for the sound, player input (for games) and the interrupts for the system. Because of everything the computer must do to make modern 3-D games and multi-media presentations happen, it's easy for even the fastest modern processors to become overworked and unable to serve the various requirements of the software in real time. It's here that the graphics co-processor helps: it splits the work with the CPU so that the total multi-media experience can move at an acceptable speed.
As we've seen, the first step in building a 3-D digital image is creating a wireframe world of triangles and polygons. The wireframe world is then transformed from the three-dimensional mathematical world into a set of patterns that will display on a 2-D screen. The transformed image is then covered with surfaces, or rendered, lit from some number of sources, and finally translated into the patterns that display on a monitor's screen. The most common graphics co-processors in the current generation of graphics display boards, however, take the task of rendering away from the CPU after the wireframe has been created and transformed into a 2-D set of polygons. The graphics co-processor found in boards like the VooDoo3 and TNT2 Ultra takes over from the CPU at this stage. This is an important step, but graphics processors on the cutting edge of technology are designed to relieve the CPU at even earlier points in the process.
One approach to taking more responsibility from the CPU is done by the GeForce 256 from Nvidia. In addition to the rendering done by earlier-generation boards, the GeForce 256 adds transforming the wireframe models from 3-D mathematics space to 2-D display space as well as the work needed to show lighting. Since both transforms and ray-tracing involve serious floating point mathematics (mathematics that involve fractions, called "floating point" because the decimal point can move as needed to provide high precision), these tasks take a serious processing burden from the CPU. And because the graphics processor doesn't have to cope with many of the tasks expected of the CPU, it can be designed to do those mathematical tasks very quickly.
The new Voodoo 5 from 3dfx takes over another set of tasks from the CPU. 3dfx calls the technology the T-buffer. This technology focuses on improving the rendering process rather than adding additional tasks to the processor. The T-buffer is designed to improve anti-aliasing by rendering up to four copies of the same image, each slightly offset from the others, then combining them to slightly blur the edges of objects and defeat the "jaggies" that can plague computer-generated images. The same technique is used to generate motion-blur, blurred shadows and depth-of-field focus blurring. All of these produce smoother-looking, more realistic images that graphics designers want. The object of the Voodoo 5 design is to do full-screen anti-aliasing while still maintaining fast frame rates.
Computer graphics still have a ways to go before we see routine, constant generation and presentation of truly realistic moving images. But graphics have advanced tremendously since the days of 80 columns and 25 lines of monochrome text. The result is that millions of people enjoy games and simulations with today's technology. And new 3-D processors will come much closer to making us feel we're really exploring other worlds and experiencing things we'd never dare try in real life. Major advances in PC graphics hardware seem to happen about every six months. Software improves more slowly. It's still clear that, like the Internet, computer graphics are going to become an increasingly attractive alternative to TV.
Back to the images of the ball. How did you do? Image A has a computer-generated ball. Image B shows a photograph of a real ball on the sidewalk. It's not easy to tell which is which, is it?