How to Wipe a Computer's Hard Drive

By: Talon Homer  | 
delete hard drive
Wiping your computer's hard drive doesn't have to involve destroying it with a hammer. You can follow a few simple steps to erase your files and start with a clean slate. Peter Dazeley/Getty Images

When electronics meet their useful end, selling or donating them is a responsible choice. It allows someone down the line to get extra use of a finely aged device, keeps the thing out of a landfill, and it may also make you a little bit of money.

However, you need to take precautions when passing along personal computers. They contain personal information like bank statements, family photos and work documents. This data should be backed up for your safekeeping, then wiped clean from the old devices. In this guide, we will show you the complete process of how to wipe a hard drive on both Windows and Mac machines.

Advertisement

For technical reasons, simply clicking "delete" on a file or dragging it to the trash bin isn't going to cut it. This is because data on a hard drive isn't actually deleted by this command. The PC's operating system simply hides it from view, which is why files can easily be taken back out of the trash.

When the bin is emptied that digital real-estate on the hard drive or solid-state drive (SSD) will be marked as open, but the actual data will remain until another file comes along to overwrite it. For this reason, data recovery services can be used to rescue files that are accidentally deleted or corrupted, but they can also be used to obtain someone else's sensitive info. SSDs in particular are very susceptible to data recovery methods.

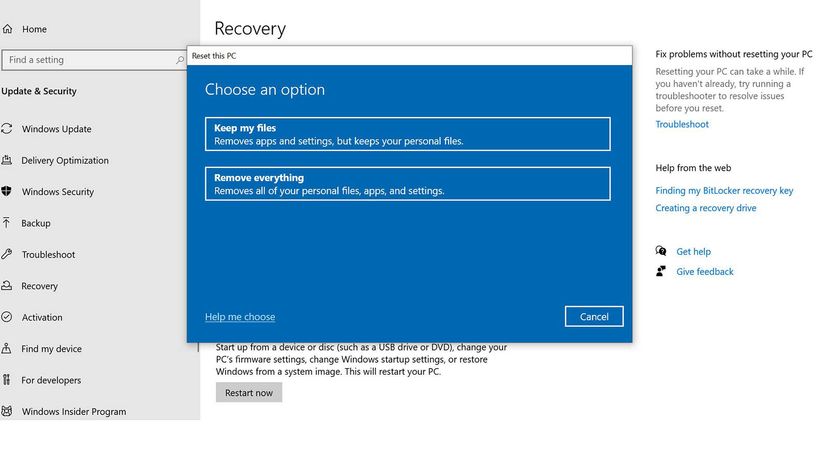
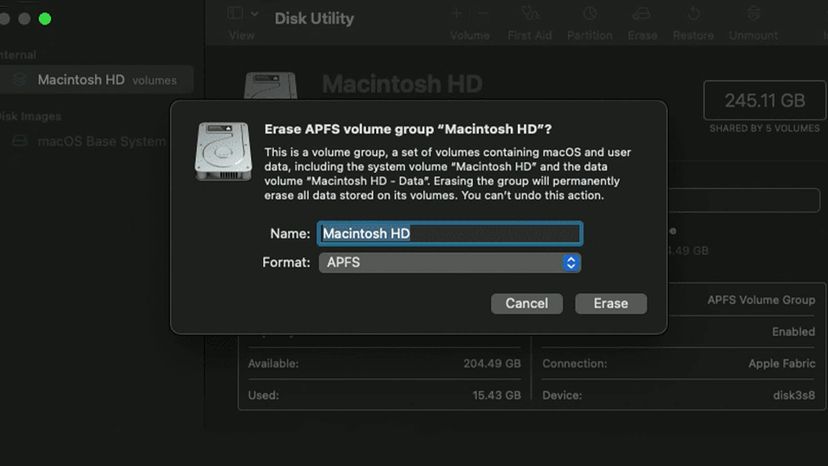
To prevent files from being recovered off your old computer, the drive must be wiped at the system level, and that requires some digging through settings. This wiping process not only deletes all files in the typical method, but also painstakingly overwrites every bit of data in the drive to make file recovery near-impossible. Since this deletion is permanent, the first thing you'll want to do is transfer anything worth keeping over to an external drive. Once that's taken care of, the actual wiping can begin.

This process varies depending on the computer's operating system, so we've listed the steps required for Windows 8, 10 and 11, and recent versions of MacOS. Completely erasing the device can take up to a few hours, so be sure to keep the device plugged in until the process is complete.

Advertisement

System Wipe, Windows 8.1 or 10

If you're using Windows 8.1 or 10, wiping your hard drive is easy. Just follow these steps:

  1. Select Settings (the gear icon on the Start menu)
  2. Select Update & Security, then Recovery
  3. Choose Remove Everything, then Remove files and Clean the drive
  4. Then click Next, Reset and Continue

You may be asked whether you would like to remove files "quickly" or "thoroughly." Select thoroughly to ensure that data cannot be recovered.

Advertisement

System Wipe, Windows 11

To reset a PC using Windows 11, follows these steps from Microsoft support:

  1. Select Start > Settings > System > Recovery
  2. Open Recovery settings
  3. Next to Reset this PC, select Reset PC. Open the dropdown table
  4. Select Remove Everything
  5. Data erasure will be set to "on" by default. Leave it at that setting for a full system wipe.
wipe hard drive
Wiping a hard drive on a PC is pretty simple. But be sure you have backed up all the files you need before you hit the OK button.
HowStuffWorks

Advertisement

System Wipe, MacOS

When performing a system wipe on Mac computers, there are a few extra things to be aware of. The steps can change based on which processor your Mac has, and potentially which update of MacOS it has.

There is one method for older Intel processors, and another for the proprietary Silicon chips that have been released in the past couple of years. Additionally, there is a third method that came about with MacOS' latest update, Monterey, in October 2021. All Silicon-based Macs support the Monterey update, but some of the Intel-based do not.

Advertisement

If you're unsure which processor and OS the computer has, you can find these specs by clicking the Apple menu in the top left corner of the screen, then selecting "About This Mac" in the dropdown. If your computer is running a previous version of MacOS, such as Big Sur, then your method of wiping will be determined by the brand of CPU.

System Wipe, Intel CPU

If your Intel-based Mac is running a version of the OS pre-October 2021, follow these steps from Apple:

  1. Start up from macOS Recovery: Turn on your Mac, then immediately press and hold Command (⌘) and R until you see an Apple logo.
  2. If asked, select a user you know the password for, then enter their administrator password.
  3. From the utilities window, select Disk Utility and click Continue.
  4. Select Macintosh HD in the sidebar of Disk Utility.
  5. Click the Erase button in the toolbar, then enter the requested details: Name: Macintosh HD Format: APFS or macOS Extended (Journaled), as recommended by Disk Utility
  6. Click Erase. However, if you see an Erase Volume Group button, click that button instead
  7. If asked, enter your Apple ID.
  8. After the erase is complete, select any other internal volumes in the sidebar, then click the delete volume (–) button in the toolbar to delete that volume.
  9. Quit Disk Utility to return to the utilities window.
  10. If you want to start up again from the disk you erased, select Reinstall macOS in the utilities window, then click Continue and follow the onscreen instructions to reinstall macOS.
wipe hard drive
The steps will vary slightly on Macs depending on which processor your Mac has, and potentially which update of MacOS it has.
Apple

Advertisement

System Wipe, Silicon CPU

If your Silicon-based Mac is running a version of the OS pre-October 2021, follow these steps from Apple:

  1. Turn on your Mac and continue to press and hold the power button until you see the startup options window. Select Options, then click Continue.
  2. If asked, select a user you know the password for, then enter their administrator password.
  3. If asked, enter the Apple ID and password previously used with this Mac.
  4. From the utilities window, select Disk Utility and click Continue.
  5. In the Internal section of the Disk Utility sidebar, make sure that you see the volume named Macintosh HD.
  6. If you previously used Disk Utility to add volumes to your startup disk, select each additional internal volume in the sidebar, then click the delete volume (–) button in the toolbar to delete that volume.
  7. During this step, disregard any internal volume named Macintosh HD or Macintosh HD - Data, as well as any volumes in the External and Disk Images sections of the sidebar.
  8. Now select Macintosh HD in the sidebar.
  9. Click the Erase button in the toolbar, then specify a name and format: Name: Macintosh HD Format: APFS or macOS Extended (Journaled), as recommended by Disk Utility
  10. Click Erase. However, if you see an Erase Volume Group button, click that button instead.
  11. If asked, enter your Apple ID.
  12. When asked whether you're sure you want to erase this Mac, click Erase Mac and Restart.
  13. When your Mac restarts, follow the onscreen instructions to choose your language.
  14. Your Mac now attempts to activate, which requires an internet connection. Use the Wi-Fi menu in the menu bar to choose a Wi-Fi network, or attach a network cable.
  15. After your Mac activates, click Exit to Recovery Utilities.
  16. If you want to start up again from the disk you just erased, select Reinstall macOS in the utilities window, then click Continue and follow the onscreen instructions to reinstall macOS.
wipe hard drive
Be sure you have a backup of all the files you want to keep before you click erase!
Apple

Advertisement

System Wipe, Monterey Update

If your MacOS was updated after October 2021, follow these steps from Apple:

  1. From the Apple menu in the corner of your screen, choose System Preferences.
  2. From the System Preferences menu in the menu bar, choose Erase All Content and Settings.
  3. Erase Assistant opens and asks you to sign in with your administrator credentials. Enter the password you use to log in to your Mac, then click OK.
  4. Click Continue to allow your settings, media, data, and the other listed items to be removed.
  5. If you're asked to sign out of Apple ID, enter your Apple ID password and click Continue.
  6. Click Erase All Content & Settings to confirm that you want to proceed.
  7. Your Mac restarts and shows a black screen or progress bar. If it needs to reconnect to a Bluetooth accessory such as a keyboard or mouse, you might be asked to turn on the accessory. If the accessory doesn't connect within 30 seconds, turn the accessory off and back on. When reconnecting to a Bluetooth keyboard, you're asked to choose a language.
  8. You might be asked to select a Wi-Fi network or attach a network cable. To select a Wi-Fi network, use the Wi-Fi menu in the upper-right corner of the screen.
  9. After joining a network, your Mac activates. Click Restart.
  10. After restart, a setup assistant guides you through the setup process, as if you're setting up your Mac for the first time.

With your old device wiped clean, you can now pass it on to a new owner with confidence that data is gone and can't be lifted.

Advertisement

Frequently Answered Questions

Can you truly wipe a hard drive?
Yes, you can wipe a hard drive.

Advertisement

Loading...