How Apple Boot Camp Works

By: Chris Pollette & Stephanie Crawford  | 
boot camp
The Microsoft Windows website is seen on an iMac computer monitor at an Apple store. Boot Camp is the software that allows Intel-based Macs to run Microsoft's Windows XP operating system. Justin Sullivan/Getty Images

Back before 2006 (which is like 100 years ago in the technology industry), there was a clear dividing line between Apple's Macintosh computers and Windows PCs. MacOS couldn't run on PCs, and Microsoft Windows couldn't run on Macs. This created a great rift between users of each system. It wasn't unusual to hear heated arguments between two users about which was the better system. A few brave souls tried to take an all-inclusive approach by trying to run both using virtualization software, but even that presented limitations. If you wanted to use the full features of both operating systems, you'd have to buy both a Mac and a PC.

But in 2006, that all changed. Because in 2006, Apple began moving away from its PowerPC processors and offered Mac hardware with Intel processors like those used in PCs. This introduced the possibility that Windows and Windows-based applications could run on Mac hardware just as they run on PCs. At the same time, Apple released Mac OS X Tiger (10.4), the first Mac OS to support running on Intel processors [source: Apple, Buchanan].

Advertisement

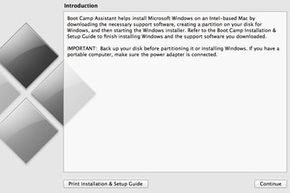
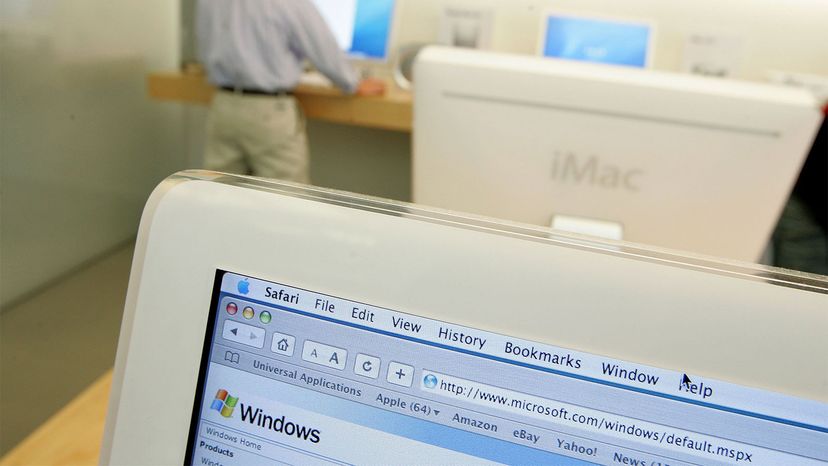
Boot Camp is software developed by Apple, in cooperation with Microsoft, designed to effectively run Windows on Mac hardware. By using Boot Camp, you don't have to choose whether to install either macOS or Windows. Instead, you can install both, and you can switch between them just by rebooting and selecting the other OS.

This article covers how Boot Camp works and how you can set it up on your Mac. Boot Camp has been available as part of Mac OS X since Leopard (10.5), released in 2007. The latest version of Boot Camp as of this writing, macOS 11 Big Sur, supports Windows 10. Boot Camp only works with Intel Macintoshes, which as of mid-2021 are in the process of being phased out.

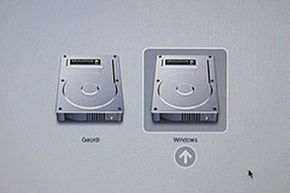
Before we dive into Boot Camp, let's look at how the partitions work on your Mac's hard drive, and how the Mac knows which partition to use when you boot.

Hard Drive Partitions

Boot Camp software relies on controlling how a Mac boots. To understand how Boot Camp takes control, let's first look at the Mac boot process. Specifically, we need to look at how a Mac reads and uses its hard drive, which stores the operating systems and all your data.

The hard drive is divided into one or more partitions. A partition is a range of physical addresses on the hard drive. In other words, the partition tells the computer where to read and write bits of data inside the hard drive. Information about the partitions on a hard drive is stored in a partition table.

Advertisement

When you boot your Mac, part of the boot process includes accessing the first few bytes of data of the hard drive. Those first bytes point to the partition table. From there, the partition table indicates which partition has the operating system and other data needed to finish booting the Mac.

When your Mac is fresh out of the box, it recognizes all the available storage space on your hard drive as one single partition. This is sufficient for most users, and it makes it easy to track your total available hard drive space.

However, if you want to install multiple different operating systems on the same hard drive, you have to create different partitions for them. You could use any disk utility to create and format new partitions. Boot Camp, though, takes care of this partitioning for you. Boot Camp will resize your existing macOS partition and create and format a new partition for Windows. Boot Camp could also help in partitioning a separate hard drive if you had multiple hard drives in your Mac.

When it boots, how does the Mac know which partition to target? The partition table has an indicator of which partition to use when booting. Your Mac looks for its operating system on that partition. If you have both Mac and Windows, though, you need some way to select between those partitions. Boot Camp's role is to automate that selection so you don't have to worry about partition tables. Using Boot Camp, you'll have two options for switching between your Mac and Windows partitions:

  • Use the Boot Camp utility to indicate you want to switch to the other partition, and then reboot.
  • Use the Option key during the white splash screen while booting and select the partition you want to use.

Now that you know what Boot Camp's doing, let's look at how to set it up on your Mac.

Preparing to Set Up Boot Camp

The Boot Camp Assistant utility in Mac OS X steps you through the process of setting up Boot Camp.
The Boot Camp Assistant utility in macOS steps you through the process of setting up Boot Camp.
HowStuffWorks

It is a very good idea to back up your Mac before beginning the Boot Camp setup process.

When you set up Boot Camp, you'll be stepping through a wizard known as the Boot Camp Assistant. After setup is complete, you can use the Boot Camp Assistant again to remove or reinstall Windows if you need to later. To open the Boot Camp Assistant, click on your Finder, select Applications from the left, scroll down and select Utilities, and then double-click Boot Camp Assistant.

Advertisement

Before you continue, make sure you have the following. We'll take a closer look at each of these before going on, including what to do if you don't have one:

  • The Windows 10 install ISO file
  • A blank 16 GB or larger MS-DOS-formatted USB drive (you may not need this, depending on the Mac and version of the operating system you use)

You can download an ISO of Windows from Microsoft's website. Apple has some additional recommendations:

  • Update your version of macOS to the most recent version your Mac can use — Apple may have updated Boot Camp.
  • You need at least 64 GB of free space on your hard drive , but you'll benefit more if you can spare 128 GB — that gives Windows enough operating space to install updates.
  • Use a USB flash drive with at least 16 GB as the installation media — although some Macs running MacOS 10.15 (El Capitan) and macOS 11 (Big Sur) don't even require an external installation disk.
  • Download a 64-bit version of Windows 10 (Home or Pro) from Microsoft — you'll need the full version, not an updater, if you're installing Windows for the first time.

The Open Boot Camp Help button when you open Boot Camp Assistant will take you to Apple's support website, where you can find instructions how to proceed.

When you click "Continue" on the "Introduction" screen, you'll see a slider that lets you adjust the size of the macOS and Windows partitions. Apple says that once the sizes of the partitions has been set, it can't be changed. There's an option above the slider that says "Choose a Windows 10 ISO file..." Once you've set the partition sizes and have shown Boot Camp Assistant where the installation file is, the "Install" button begins setting up the Windows partition. Apple installs Windows support files after it finishes installing Windows itself.

Boot Camp Setup: Partitioning

The Boot Camp Assistant gives users a simple slider tool to allocate partition space between Mac OS X and Windows.
The Boot Camp Assistant gives users a simple slider tool to allocate partition space between macOS and Windows.
HowStuffWorks

By default, Boot Camp will reserve 42 GB for your Windows partition and leave the rest for a single macOS partition. You can see this on the partition slider in the Boot Camp Assistant. If you drag the grey dot between the two partitions on the slider, you can adjust how the hard drive is split between MacOS and Windows.

Remember that Apple recommends at least 64 GB space for your Windows partition, and at least 128 GB for the best experience. But those recommendations are for the Windows operating system, and there's a good chance you'll be using Windows to run some specific software. Any additional Windows software you install will take up part of the partition, so you'll need to take that into account. For example, if you're using Windows to play "World of Warcraft," add at least another 25 GB of space to meet the game's minimum requirements, and you'll probably want more to save game data and install expansions over time.

Advertisement

As you think about how much storage you need on your Windows partition, though, don't ignore the space you'll need on the Mac side. The slider should show you the available space you have for macOS as you increase or decrease the amount on the Windows side. Boot Camp Assistant will not let you go below 8 GB of available space on the Mac side, but you'll want a lot more than that if you use your Mac for storing or editing music and videos.

Boot Camp Setup: Installing Windows

By default, Boot Camp places an icon in your Windows System Tray, which you can use to reboot to Mac OS X.
By default, Boot Camp places an icon in your Windows System Tray, which you can use to reboot to macOS.
HowStuffWorks

Once Boot Camp Assistant finishes its installation, your Mac will reboot to the Windows installer. If you are asked, select the partition named "BOOTCAMP" when asked where to install Windows. The installer will probably take care of this for you, and will format the partition automatically.

Finish installing and configuring Windows as you would on a PC. During the reboot step of the install, the Mac should reboot directly back to the Windows partition. Later, we'll look at how to toggle between the Windows and macOS partitions.

Advertisement

After this the Mac will reboot again, this time displaying a "Welcome to the Boot Camp Installer" screen. Follow the on-screen directions to continue installing Boot Camp and the drivers your Mac needs to run Windows properly, such as the speakers, microphone and webcam.

After you've installed the Apple software, you'll notice a Boot Camp icon in the Windows System Tray. Don't try to remove this, as it provides one of your two options for switching between partitions. Let's see how that works next.

Switching Between Mac OS X and Windows

When you first boot, press "Option" during the Mac's white boot screen to select which partition to boot.
HowStuffWorks

Once you've set up Boot Camp, you have three different ways to make the switch between partitions. Let's look at these based on their starting points.

If you're in Windows, you can switch to the macOS partition using the Boot Camp icon in the System Tray. Click the gray diamond-shaped icon and click "Restart in macOS" from the pop-up menu. Then, confirm your choice to reboot to macOS.

Advertisement

If you're in macOS, you can switch to the Windows partition using the Startup Disk utility within System Preferences. In the Startup Disk, choose the "Windows on BOOTCAMP" partition, and click "Restart." Then, confirm your choice to reboot to Windows.

If the Mac was powered off, you can choose which partition to boot before the Mac selects for you. To do this, press the Option key on the Mac while it's on the blank white boot screen. Within a couple of seconds, the Mac should present the two partitions to you on the screen. Use the arrow keys to select a partition, and press Enter to boot to it. This Option key feature is available either when booting from a powered-off state or if you're rebooting from Windows.

In November 2020, Apple announced it would begin selling Macintosh computers with Apple's own M1 chip, rather than using Intel's processors. As of this writing, you can't use Boot Camp to create a dual-boot M1 Mac, but software company Parallels released a version of its Desktop software that runs Windows 10 within MacOS. Unfortunately, regular versions of Windows won't run on Apple's new processor lines, and you have to use a version of Windows that runs on ARM-based processors like the M1. As a result, some Windows apps will not run on that version of the operating system.

Lots More Information

Related Articles

More Great Links

  • Apple. "Boot Camp Assistant User Guide." Apple, Inc. (July 31, 2021). https://support.apple.com/guide/bootcamp-assistant/welcome/mac
  • Apple. "Restart your Mac in macOS or Windows." Apple, Inc. March 24, 2020. (July 31, 2021). https://support.apple.com/en-us/HT208123
  • Apple. "Apple to Use Intel Microprocessors Beginning in 2006." Apple, Inc. Jun. 6, 2005. (July 31, 2021) https://www.apple.com/newsroom/2005/06/06Apple-to-Use-Intel-Microprocessors-Beginning-in-2006/
  • Buchanan, Matt. "Cheetahs, Pumas and Tigers, Oh My: The Two-Minute OS X History Primer." Gizmodo. 2007. (July 31, 2021) http://gizmodo.com/267621/cheetahs-pumas-and-tigers-oh-my-the-two+minute-os-x-history-primer
  • Hattersley, Lucy. "How to install & set up Linux on a Mac." Macworld UK. October 6, 2016. (July 31, 2021) https://www.macworld.co.uk/how-to/how-install-linux-on-mac-3637265/
  • Marshall, Carrie. "You can now run Windows on M1 Macs, just in time for the new MacBook Pro at Apple's Event." T3. MSN News. April 16, 2021. (July 31, 2021) https://www.msn.com/en-us/news/technology/you-can-now-run-windows-on-m1-macs-just-in-time-for-the-new-macbook-pro-at-apples-event/ar-BB1fI0bu