How to Upload Photos on Facebook

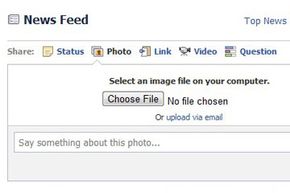
screen capture of choose image option in Facebook
You can immediately upload a single photo by choosing an image from your hard drive. Other options let you upload many pictures at once.
Screenshot by HowStuffWorks.com

In an alternate universe, perhaps there's a version of Facebook without faces -- and that strange variant is probably the most boring Web site ever. The photos that let you share the faces of your friends and family are a key reason that Facebook is exceedingly popular. Now you just need to understand the best ways to share your photos.

As with all things on the Web, there are multiple ways to accomplish Facebook-related tasks. That includes the various methods you might employ in uploading and editing pictures destined for Facebook fame.

Advertisement

But before we get to the specifics, here are some critical reminders for anyone taking their first plunge into Facebook photo fun. For one, don't even think about uploading images that you wouldn't share with every one of your friends and family.

So keep those pictures of your naked, drunken self to … well, yourself. Because once that picture is online, you should always assume that it could appear anywhere else on the Web -- maybe even on your grandmother's computer screen. Don't assume that privacy controls of any kind will protect your pictures or your reputation.

With that caveat out of the way, it's simple to share pictures on Facebook. After you log in to your account, you'll see your "news feed," which is a chronological list of updates, photos and links that your Facebook friends have posted.

If you simply want to post a picture to your "wall" so that it appears in your friends' "news feed," click "photo," which is at the top of the page next to "share." You'll see three self-explanatory options: "upload a photo from your drive," "take a photo with a webcam" and "create an album with many photos."

With the first two options, you can immediately share a single image on your "wall." Using the third option, you can upload as many photos as you want, but this process takes a bit more time and you'll have different options for sharing these images.

You'll find out more about each of these tools in a moment. Keep reading, and you'll discover easy ways to edit and upload images to this ubiquitous social networking site.

Advertisement
How to Edit Pictures for Facebook

There are a lot of ways to prepare your images for Facebook. Perhaps the number one tip, however, is to be savvy about the way you use the site's photo features.

Keep in mind that most people don't view Facebook as an exclusively photo-oriented site. So if you want to share 7,800 images of every moment of your trip to Mount Rushmore, upload the photos to a site such as SmugMug or Flickr and just share the link to those images on Facebook -- don't overload your friends with massive (and potentially tears-of-boredom-inducing) albums containing zillions of vacation pictures.

Advertisement

As for the photos themselves, there are many ways you can jazz up your pictures to make them more Facebook-worthy. You may already have image-editing software, such as Adobe Photoshop Elements or Corel PaintShop Photo Pro, installed on your computer.

If not, you don't need to spend any money on special programs. Instead, simply search the Web for free picture editors. With some of these programs, you don't even need to install software on your computer. For example, LunaPic and Picnik are free online editors. You can upload images to the sites, tweak features like color, contrast and brightness, or even add dozens of special effects. Then you can save the picture directly to your hard drive or, in some instances, share it directly to Facebook, Twitter and other social networking sites. For more detailed tips on editing Facebook photos, check out How to Edit Pictures on Facebook.

For now, we'll assume that you're saving edited images to your computer. Once your masterpieces are complete, you can begin transferring them to your Facebook account. There are numerous ways to upload pictures to Facebook. Not only does the site itself provide more than one way to add pictures, but there's also a deluge of third-party apps and programs with Facebook photo features. These are for both desktop computers and dozens of types of mobile devices, like smartphones.

Let's start with one of the fastest options. Select "upload a photo from your drive," browse to the folder containing the pictures you want to upload, and double-click on the one you want. In the text box, you can add a comment about the photo before you post it. Next to the "share" button, you can also click the padlock symbol to reveal a drop-down menu that allows you to control which groups of friends see this particular image.

This option works for single images only, but there are other methods for uploading a lot more photos to Facebook -- and without so much labor. On the next page, we'll show you how.

Advertisement

Uploading and Tagging Facebook Photos

screen capture of tagging friends in photos on Facebook
Choose your images carefully, and tag them nicely. Don’t tag your friends in photos of questionable taste – otherwise you might lose a few pals.
Screenshot by HowStuffWorks.com

You already know how to use the "upload from your drive" feature to zip a single image to Facebook, but let's back up for a moment. When you follow the instructions on the previous page and see the "choose file" button, you'll also notice an option called "upload via e-mail." If you click on it, Facebook will send you a special, personalized e-mail address. When you create a new e-mail with a photo (or video) attachment and send it to this address, Facebook will post the image or video to your account.

These options are great for a photo or two, but you can also upload and organize many photos at once. Click "create an album" and then choose "select photos." Note that this uploader is powered by Adobe Flash, which doesn't work with all browsers and images. If you encounter problems, click on the link for the "basic uploader" and then you can choose up to five images for simultaneous transfer.

Advertisement

Once you click "select photos," choose the folder with the images you want. You can select multiple photos (up to 200) by holding down the Ctrl key while you click the desired images. Next, press the Enter key or hit the OK button.

Then you can type a name for your album and the location where the pictures were taken, as well as specify whether you want to upload high- or standard-resolution images. Unless you're using Facebook as a repository for your pictures, pick the standard-resolution option, as it greatly reduces the amount of time it takes to finish the transfer. You can also choose which groups of friends you want to have access to the album.

After you create the album, Facebook will prompt you to tag, or name, the people in your images. When you begin typing the first letters of the name of one of your Facebook friends, the rest will automatically appear. Facebook is also able to recognize the same person person in multiple photos, in essence tagging friends for you automatically.

When it comes to tagging, be kind and be cautious. Don't upload and tag pictures of your friends in compromising situations. Facebook makes it easier than ever before to humiliate your pals, but keep in mind that even in the digital age, what goes around, comes around. You can also skip tagging altogether, which your friends might very well appreciate.

Pictures tell a story that words cannot. From distant family to your flurry of online-only friends, pictures are the reason people check Facebook status updates obsessively and stay in touch with people they'd otherwise lose track of. So with caution in mind, go crazy with Facebook photos, and share stories for all your friends to see.

Advertisement

Lots More Information

Related Articles

More Great Links

  • Facebook Help Center. (July 1, 2011) http://www.facebook.com/help
  • Facebook Apps. "Picasa Uploader." (July 1, 2011) http://apps.facebook.com/picasauploader/
  • Komando, Kim. "Turn off Facebook's New Photo-Tagging Feature." Komando.com. June 11, 2011. (July 2, 2011) http://www.komando.com/tips/index.aspx?id=10902
  • HP Digital Photography. "Upload, Organize, and Post Your Photos to Facebook." HP.com. (July 1, 2011) http://www.hp.com/united-states/consumer/digital_photography/organize_archive_photos/tips/upload-facebook.html
  • Johnson, Dave. "Taking a Great Facebook Profile Picture." PCworld.com. June 20, 2011. (July 1, 2011) http://www.pcworld.com/article/230668/taking_a_great_facebook_profile_picture.html
  • Pash, Adam. "Quickly Upload Photos and Video to Facebook via Email." Lifehacker.com. July 23, 2009. (July 1, 2011) http://lifehacker.com/5321149/quickly-upload-photos-and-video-to-facebook-via-email
  • Steve's Digicams. "How to Upload iPhone Photos to Facebook." Steves-digicams.com. (July 1, 2011) http://www.steves-digicams.com/knowledge-center/how-tos/online-sharing-social-networking/how-to-upload-iphone-photos-to-facebook.html

Advertisement

Loading...